Introduction To Dart Programming Language
- Overview
- Environment
- Variables
- Operators
Finwaver.com
Your school or business runs better on finwaver.com. Sign up for free one (1) week try.
Login & Registration forms for social network app
This week, we will design the registration and login GUI of the social network app project for this course.
You should therefore create a new flutter project and call it socialize. This will be our project for this course.
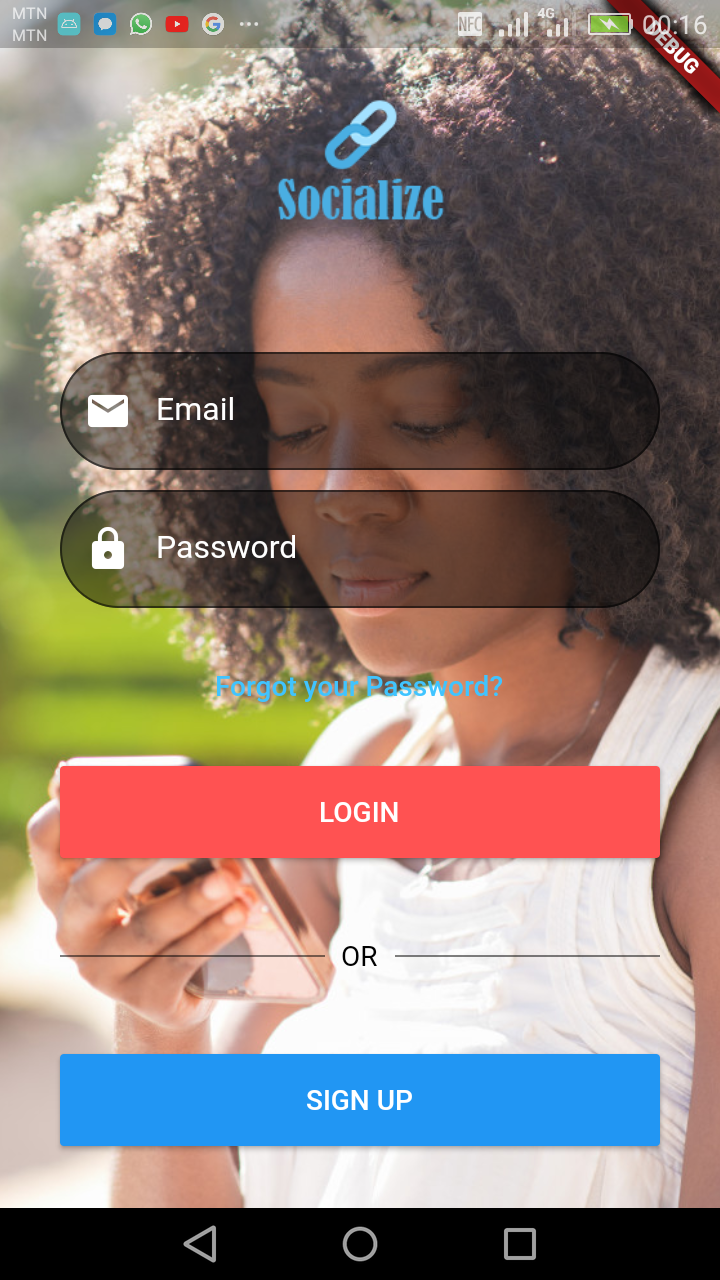
Designing the Login & Registration form GUIs
![]()
logo.png

bg.jpg
1. Create a folder in your socialize flutter project and name it assets
2. Save the logo.png and bg.jpg images in the assets folder
3. Record the asset images in the pubspec.yaml file and click on Pub Get
Your pubspec.yaml file should look like this:
# The following section is specific to Flutter.
flutter:
  assets:
    - assets/logo.png
    - assets/bg.jpg
  # the material Icons class.
  uses-material-design: true
main.dart
Our home page will be a login form so that users who have already signed up can login. A new user will have to click on the sign up button to fill a form for sign up.
As you already know, the flutter app starts the code from the main.dart file. Hence our home page must be in the main.dart file.
import 'package:flutter/material.dart';
import 'signup.dart';
void main() {
  runApp(MyApp());
}

class MyApp extends StatelessWidget {
  @override
  Widget build(BuildContext context) {
    return MaterialApp(
      title: 'Socialize',
      theme: ThemeData(
        primarySwatch: Colors.blue,
        visualDensity: VisualDensity.adaptivePlatformDensity,
      ),
      home: MyHomePage(title: 'Login'),
    );
  }
}

class MyHomePage extends StatefulWidget {
  MyHomePage({Key key, this.title}) : super(key: key);
  final String title;

  @override
  _MyHomePageState createState() => _MyHomePageState();
}

class _MyHomePageState extends State {
  // For CircularProgressIndicator.
  bool visible = false ;
  final _formKey = GlobalKey();
  // Getting value from TextField widget.
  final emailController = TextEditingController();
  final passwordController = TextEditingController();
  @override
  Widget build(BuildContext context) {
    return Scaffold(
      body: Stack(
      children: [
      Container(
        decoration: new BoxDecoration(
        image: new DecorationImage(
        fit: BoxFit.cover,
        image: AssetImage("assets/bg.jpg"), //Background image
      )),
      ),
      Center(
        child: SingleChildScrollView(
           padding: EdgeInsets.all(30.0),
            child:Form(
                key: _formKey,
                child: Column(
                    children: [
                       SizedBox(
                         height: 60.0,
                       ),
                      SizedBox(
                        height: 70.0,
                        child: Image.asset(
                        "assets/logo.png",
                        fit: BoxFit.contain,
                        ),
                      ),
                      SizedBox(
                        height: 60.0,
                      ),
                      TextFormField(
                          controller: emailController,
                          keyboardType: TextInputType.emailAddress,
                          validator: (value) {
                            if (value.isEmpty) {
                              return 'Please enter your email';
                            }
                            return null;
                          },
                          decoration: InputDecoration(
                            prefixIcon: Icon(
                              Icons.email,
                              color: Colors.white,
                            ),
                            hintStyle: TextStyle(color: Colors.white),
                            filled: true,
                            fillColor: Colors.black45,
                            hintText: 'Email',
                            border:
                            OutlineInputBorder(borderRadius: BorderRadius.circular(30.0))
                          ),
                      ),
                      SizedBox(
                        height: 10.0,
                      ),
                      TextFormField(
                        obscureText: true,
                        controller: passwordController,
                        validator: (value) {
                          if (value.isEmpty) {
                          return 'Please enter your password';
                          }
                          return null;
                        },
                        decoration: InputDecoration(
                          filled: true,
                          prefixIcon: Icon(Icons.lock, color: Colors.white),
                          hintStyle: TextStyle(color: Colors.white),
                          fillColor: Colors.black45,
                          hintText: 'Password',
                          border:
                          OutlineInputBorder(borderRadius: BorderRadius.circular(30.0))
                        ),
                      ),
                      SizedBox(
                        height: 15.0,
                      ),
                      Column(
                        crossAxisAlignment: CrossAxisAlignment.stretch,
                        children: [
                          FlatButton(
                            onPressed: () {},
                            child: Text(
                            'Forgot your Password?',
                            style: TextStyle(color: Colors.lightBlueAccent),
                          )),
                          SizedBox(
                            height: 15.0,
                          ),
                          RaisedButton(
                            onPressed: () {
                            // Validate returns true if the form is valid, otherwise false.
                            if (_formKey.currentState.validate()) {
                               //Process form
                            }
                          },
                          child: Padding(
                            padding: EdgeInsets.all(15.0),
                            child: Text('LOGIN')),
                            color: Colors.redAccent,
                            textColor: Colors.white,
                          ),
                        ],
                      ),
                      SizedBox(
                        child: Visibility(
                           visible: visible,
                            child: Container(
                              margin: EdgeInsets.only(top: 10),
                              child:SizedBox(
                                width:20,
                                height:20,
                                child:CircularProgressIndicator()
                              ),
                           )
                        ),
                      ),
                      SizedBox(
                         height: 40.0,
                      ),
                      Column(
                        crossAxisAlignment: CrossAxisAlignment.stretch,
                        children: [
                            Row(
                              children: [
                                Expanded(
                                  child: Divider(
                                      color: Colors.black,
                                      height: 8.0,
                                  ),
                                ),
                                SizedBox(
                                  width: 8.0,
                                ),
                                Text(
                                  'OR',
                                  style: TextStyle(color: Colors.black),
                                ),
                                SizedBox(
                                  width: 8.0,
                                ),
                                Expanded(
                                  child: Divider(
                                    color: Colors.black,
                                    height: 8.0,
                                  ),
                                )
                              ],
                            ),
                          ],
                      ),
                    SizedBox(
                      height: 40.0,
                    ),
                  Column(
                    crossAxisAlignment: CrossAxisAlignment.stretch,
                    children: [
                      // TODO Social Icons
                      RaisedButton(
                        onPressed: () {
                          // Load the sign up page.
                          Navigator.push(
                              context,
                              MaterialPageRoute(builder: (context) => Signup())
                          );
                        },
                        child: Padding(
                            padding: EdgeInsets.all(15.0),
                            child: Text('SIGN UP')),
                            color: Colors.blue,
                            textColor: Colors.white,
                      ),
                    ],
                  ),
                ],
                ),
            ),
         ),
      ),
      ],
      ),
    );
  }
}
Key Explanations
RaisedButton(
  onPressed: () {
    // Load the sign up page.
    Navigator.push(
        context,
        MaterialPageRoute(builder: (context) => Signup())
    );
  },
),
The statements to be executed when the button is clicked is placed in the {} of the onPressed:() method.
The Navigator.push method is used to route to a different page. If the class of that page is in a different dart file, you will have to import that file in the dart file that you are calling the class for that page.
When the signup button is pressed, the above code routes to the sign up page. The Signup() class is in the signup.dart file, hence in the main.dart file, there must be an import of the signup.dart file as you can see in the main.dart code above. Thus:
import 'signup.dart';To create space between widgets, the SizeBox widget is used. Thus:
SizedBox(
   height: 40.0,
),
The height value depends on how much space you wish to have between the widgets.
TextEditingController variables are created for each of the form fields and specified in the TextFormField widget.
final _formKey = GlobalKey();
// Getting value from TextField widget.
final emailController = TextEditingController();
final passwordController = TextEditingController();
The form key is also declared. This key is used to check if all fields are filled before the form is being processed.
Email TextFormField
TextFormField(
    controller: emailController,
    keyboardType: TextInputType.emailAddress,
    // The validator receives the text that the user has entered.
    validator: (value) {
      if (value.isEmpty) {
        return 'Please enter your email address';
      }
      return null;
    },
    decoration: InputDecoration(
      prefixIcon: Icon(
        Icons.email,
        color: Colors.white,
      ),
      hintStyle: TextStyle(color: Colors.white),
      filled: true,
      fillColor: Colors.black45,
      hintText: 'Email',
      border:
      OutlineInputBorder(borderRadius: BorderRadius.circular(30.0))
    ),
),
The controller property indicates which controller the field corresponds. The values of the field is retrieved by the controller as you will later see.
The keyboardType property indicates that the field is an email and so the keyboard should include the @ and .com keys
The hintText is the text that should be displayed in the text field before a user starts typing in that field (placeholder)
The validator validates the field. If the value is empty, the text Please enter your email address is shown beneath the text field in red color to alert the user.
Password TextFormField
TextFormField(
  obscureText: true,
  controller: passwordController,
  // The validator receives the text that the user has entered.
  validator: (value) {
    if (value.isEmpty) {
    return 'Please enter your password';
    }
    return null;
  },
  decoration: InputDecoration(
    filled: true,
    prefixIcon: Icon(Icons.lock, color: Colors.white),
    hintStyle: TextStyle(color: Colors.white),
    fillColor: Colors.black45,
    hintText: 'Password',
    border:
    OutlineInputBorder(borderRadius: BorderRadius.circular(30.0))
  ),
),
The obscureText property makes the text changes to * so that the password is hidden
signup.dart
import 'package:flutter/material.dart';
import 'main.dart';
class Signup extends StatelessWidget {
// This widget is the root of your application.
@override
Widget build(BuildContext context) {
return MaterialApp(
title: 'Socialize',
theme: ThemeData(
primarySwatch: Colors.blue,
visualDensity: VisualDensity.adaptivePlatformDensity,
),
home: MyHomePage(title: 'Sign Up Home Page'),
);
}
}
class MyHomePage extends StatefulWidget {
MyHomePage({Key key, this.title}) : super(key: key);
final String title;
@override
_MyHomePageState createState() => _MyHomePageState();
}
class _MyHomePageState extends State {
// For CircularProgressIndicator.
bool visible = false ;
final _formKey = GlobalKey();
// Getting value from TextField widget.
final nameController = TextEditingController();
final emailController = TextEditingController();
final passwordController = TextEditingController();
final confirmPasswordController = TextEditingController();
@override
Widget build(BuildContext context) {
return Scaffold(
body: Stack(
children: [
Container(
decoration: new BoxDecoration(
image: new DecorationImage(
fit: BoxFit.cover,
image: AssetImage("assets/bg.jpg"), //Background image
)),
),
Center(
child: SingleChildScrollView(
padding: EdgeInsets.all(30.0),
child:Form(
key: _formKey,
child: Column(
children: [
SizedBox(
height: 60.0,
),
SizedBox(
height: 70.0,
child: Image.asset(
"assets/logo.png",
fit: BoxFit.contain,
),
),
SizedBox(
height: 60.0,
),
TextFormField(
controller: nameController,
// The validator receives the text that the user has entered.
validator: (value) {
if (value.isEmpty) {
return 'Please enter your name';
}
return null;
},
decoration: InputDecoration(
prefixIcon: Icon(
Icons.person,
color: Colors.white,
),
hintStyle: TextStyle(color: Colors.white),
filled: true,
fillColor: Colors.black45,
hintText: 'Name',
border:
OutlineInputBorder(borderRadius: BorderRadius.circular(30.0))
),
),
SizedBox(
height: 10.0,
),
TextFormField(
controller: emailController,
keyboardType: TextInputType.emailAddress,
// The validator receives the text that the user has entered.
validator: (value) {
if (value.isEmpty) {
return 'Please enter your email address';
}
return null;
},
decoration: InputDecoration(
prefixIcon: Icon(
Icons.email,
color: Colors.white,
),
hintStyle: TextStyle(color: Colors.white),
filled: true,
fillColor: Colors.black45,
hintText: 'Email',
border:
OutlineInputBorder(borderRadius: BorderRadius.circular(30.0))
),
),
SizedBox(
height: 10.0,
),
TextFormField(
obscureText: true,
controller: passwordController,
validator: (value) {
if (value.isEmpty) {
return 'Please enter your password';
}
return null;
},
decoration: InputDecoration(
filled: true,
prefixIcon: Icon(Icons.lock, color: Colors.white),
hintStyle: TextStyle(color: Colors.white),
fillColor: Colors.black45,
hintText: 'Password',
border:
OutlineInputBorder(borderRadius: BorderRadius.circular(30.0))
),
),
SizedBox(
height: 10.0,
),
TextFormField(
obscureText: true,
controller: confirmPasswordController,
validator: (value) {
if (value.isEmpty) {
return 'Please re-enter password';
}
return null;
},
decoration: InputDecoration(
filled: true,
prefixIcon: Icon(Icons.lock, color: Colors.white),
hintStyle: TextStyle(color: Colors.white),
fillColor: Colors.black45,
hintText: 'Confirm Password',
border:
OutlineInputBorder(borderRadius: BorderRadius.circular(30.0))
),
),
SizedBox(
height: 15.0,
),
Column(
crossAxisAlignment: CrossAxisAlignment.stretch,
children: [
SizedBox(
height: 15.0,
),
RaisedButton(
onPressed: () {
// Validate returns true if the form is valid, otherwise false.
if (_formKey.currentState.validate()) {
//Process form
}
},
child: Padding(
padding: EdgeInsets.all(15.0),
child: Text('SIGN UP')),
color: Colors.redAccent,
textColor: Colors.white,
),
],
),
SizedBox(
child: Visibility(
visible: visible,
child: Container(
margin: EdgeInsets.only(top: 10),
child:SizedBox(
width:20,
height:20,
child:CircularProgressIndicator()
),
)
),
),
SizedBox(
height: 20.0,
),
Column(
crossAxisAlignment: CrossAxisAlignment.stretch,
children: [
Row(
children: [
Expanded(
child: Divider(
color: Colors.black,
height: 8.0,
),
),
SizedBox(
width: 8.0,
),
Text(
'OR',
style: TextStyle(color: Colors.black),
),
SizedBox(
width: 8.0,
),
Expanded(
child: Divider(
color: Colors.black,
height: 8.0,
),
)
],
),
],
),
SizedBox(
height: 20.0,
),
Column(
crossAxisAlignment: CrossAxisAlignment.stretch,
children: [
// TODO Social Icons
RaisedButton(
onPressed: () {
// Load the login page.
Navigator.push(
context,
MaterialPageRoute(builder: (context) => MyApp())
);
},
child: Padding(
padding: EdgeInsets.all(15.0),
child: Text('LOGIN')),
color: Colors.blue,
textColor: Colors.white,
),
],
),
],
),
),
),
),
],
),
);
}
}
PROCESSING FORM
Most app form values are posted to a server hosted some where. To submit form values to the server, you will have to:
1. Add the internet dependency in the pubspec.yaml file
http: newest version
Example
dependencies:
  http: ^0.12.0+2
2. Import the internet package
import 'package:http/http.dart' as http;3. Declare your TextFormField controllers as global variables
final nameController = TextEditingController();
final emailController = TextEditingController();
final passwordController = TextEditingController();
final confirmPasswordController = TextEditingController();
4. Declare a global boolean variable for showing progress animation.
Initialize the variable to false and set it to true once you are communicating to the server. Once you receive a response from the server, you can set it to false.
bool visible = false ;5. Inside a SizeBox widget, add Visibility widget as its child at the appropriate place you wish to show the progress animation.
Set the visible property to the boolean variable you declared in step 4.
6. Inside the Visibility widget, add a Container widget which also has a CircularProgressIndicator() as its child
SizedBox(
  child: Visibility(
      visible: visible,
      child: Container(
        margin: EdgeInsets.only(top: 10),
        child:SizedBox(
            width:20,
            height:20,
            child:CircularProgressIndicator()
        ),
      )
  ),
),
7. Create a Future async method for posting the form input to the server and call this method when the form validation is true
Future signup() async{

  // Showing CircularProgressIndicator.
  setState(() {
    visible = true ;
  });

}
Future async method for processing form
The visible variable for showing the progress animation is set to true in the setState(). Once it is set to true, the Visibility widget will have visible to true and the setState() method will update the screen so the progress animation can be seen.
RaisedButton(
  onPressed: () {
    // Validate returns true if the form is valid, otherwise false.
    if (_formKey.currentState.validate()) {
      //Process form
      signup();
    }
  },
),
Calling the method if form validation is true
The Future async function for processing the form is called if the form validation state is true. Thus:
if (_formKey.currentState.validate()) {
      //Process form
     signup();
 }
8. In the form processing method, retrieve each of the TextFormField values by using their controllers you declared in step 3
9. Store all data with param name and call the web api using the http.post method
10. import dart:convert for the json, retrieve and analyze response from the server
import 'dart:convert';Example (Sign up form processing)
Future signup() async{
    // Showing CircularProgressIndicator.
    setState(() {
      visible = true ;
    });
    String name = nameController.text;
    String email = emailController.text;
    String password = passwordController.text;
    // SERVER SIGN UP API URL
    var url = 'http://192.168.43.94/socialize/signup.php';
    // Store all data with Param Name.
    var data = {'name': name, 'email': email, 'password': password};
    // Starting Web API Call.
    var response = await http.post(url, body: json.encode(data));
    // Getting Server response into variable.
    Map<String, dynamic> responseJson = jsonDecode(response.body);
    var message = responseJson['message'];
    var success = responseJson['success'];
    var session = responseJson['session'];
}
You will see a practical example when we are processing our registration and login form in the subsequent week.


Digital Address: GZ-033-0057
King Kotey Road
Teshie - Accra
Ghana
+233 59 993 7122
Finland
+358 44 986 0934
info@kuulchat.com
![]()
© Copyright 2015 - 2024
All Rights Reserved