Setting text font before beginning to type
The types of fonts can be found in the Home tab at the font section.
Select the type of font you want from the list.
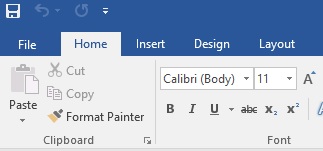
Figure: Font types. Calibri (Body) is by default
The formal font type is Times New Roman so for formal documentation, you can choose the Times New Roman font.
The default font style when you start a word document is Normal. In most documents, the style is No Spacing. The font type changes to the default anytime you change the style.

Figure: Font styles
It is therefore important to select the type of style you want before selecting the font type. Otherwise once you change the style, the font type will automatically change so your previous selection will be futile.
Setting selected text font type
- Select the text you want to set the font
- Select the appropriate font type. The selected text will then be updated to the font type selected.
Setting text font size
The font size is at the right side of the font type. You can select your appropriate font size from the drop list. You can as well enter your own font size which is not in the list by deleting the value in the size box and entering your own.
The formal font size is 12. For formal documentation, you should therefore set the font size to 12. By default the font size is 11.
You should therefore set the style to No Spacing, font type to Times New Roman and size to 12 for formal documentation before you start typing.

Figure: Formal font settings
Setting font size for selected text
- Select the text you want to set the size
- Select the appropriate size from the font size list or enter your own size
Change text case
- Select the text you want to change the case
- Click on the case Icon

- Select the appropriate option you want from the list
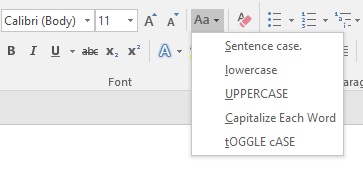
Figure: Text case options
Change text color
- Select the text you want to change the color
- Click on the font color icon

- From the drop down list, choose the appropriate color you want to change the text color to
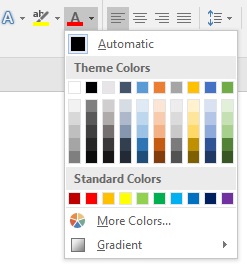
Figure: Font colors
Text alignments
By default, the selected text alignment is left. You click on the appropriate alignment you want before typing your document. Below is the display example of each of the text alignments.
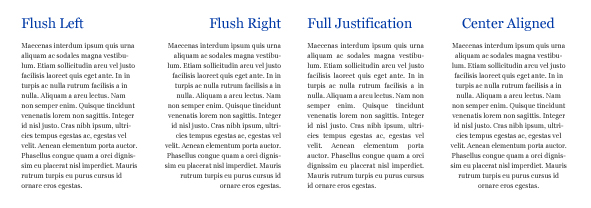
Figure: Text alignment type examples
To align particular texts, you have to select the texts and click on the appropriate alignment option you want.
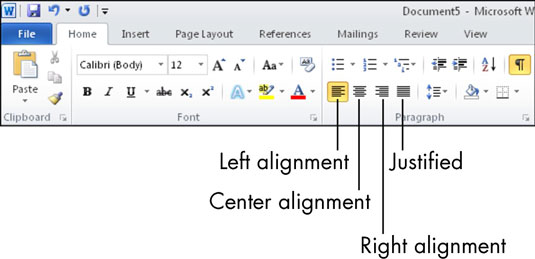
Figure: Text alignments
Shortcuts for the text alignments
Left - Ctrl+L
Center - Ctrl+E
Right - Ctrl+R
Justify - Ctrl+J
Indent Paragraph
Indenting almost always involves shifting the edge of a paragraph inward toward the center of the page.
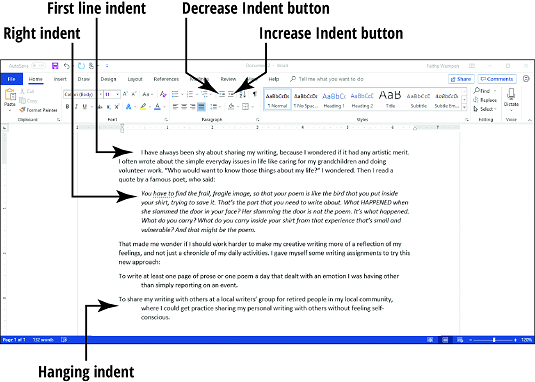
Figure: Indent
Possible types of indents in Word
First-line indent
Only the first line of the paragraph is indented.
Hanging indent
Every line of the paragraph except the first one is indented.
Left indent
All lines of the paragraph are indented in relation to the left margin.
Right indent
All lines of the paragraph are indented in relation to the right margin.
If you want a special indent (hanging or first-line), use the Paragraph dialog box.
To do so, follow these steps:
- Select the paragraph(s) to which the setting should apply.
- On the Home or the Layout tab, click the small icon in the bottom right of the Paragraph group.

- In the Paragraph dialog box that opens, enter values in the Left and/or Right text boxes as desired to create overall indents for the paragraph(s).
- If you want a special type of indent (such as hanging, or first-line), open the Special drop-down list and make your selection. Then enter the amount of the special indent in the text box to the right.
- Click OK.
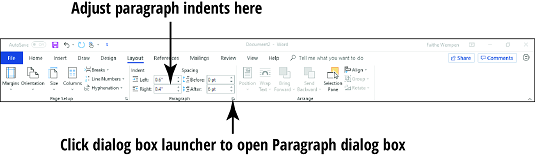
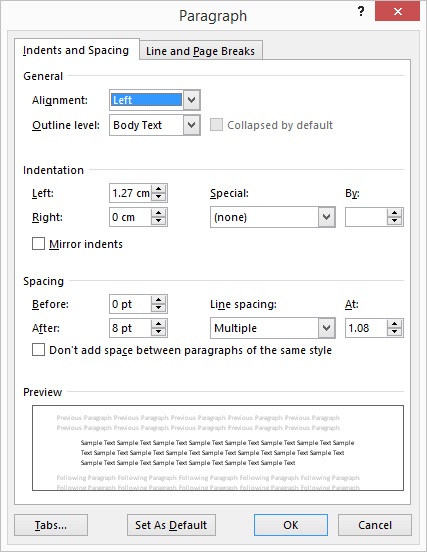
Figure: Paragraph dialog box
Text Decoration
This means making text(s) bold (B - Ctrl +B), italics (I - Ctrl+I), underline (U - Ctrl+U) and strikethrough a text.
To bold, click on the bold icon or Ctrl+B
To italics, click on the italics icon or Ctrl+I
To underline, click on the underline icon or Ctrl+U. You can as well click on the drop down for more underline options and even change the underline color.
To strikethrough a text, select the text and click on the strikethrough icon
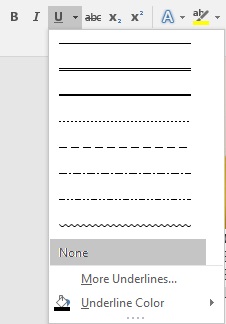
Figure: Text decoration options
Subscript and Superscript
The subscript and superscript icons are found at the right side of the strikethrough

Subscript
To subscript a text(letter) follow the steps below:
- Place the cursor in front of the text
- Click on the subscript icon
 or Ctrl+=
 - Enter the subscript letter(text)
- When done, click on the subscript icon again to take off(deselect) the subscript feature
Superscript
To superscript a text(letter) follow the steps below:
- Place the cursor in front of the text
- Click on the superscript icon
 or Ctrl++
 - Enter the superscript letter(text)
- When done, click on the superscript icon again to take off(deselect) the superscript feature
Create lists
The lists are at the top of the paragraph section. There are three types (bullets, numbering and multilevel lists)
To add a list, follow the steps below:
- Place the cursor at where the list will be inserted
- Click on the appropriate list icon
- Select the option you want
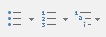
Figure: List options

Figure: Bullet
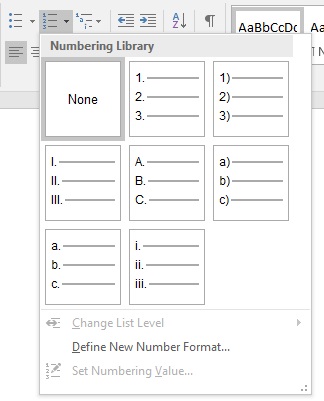
Figure: Numbering list
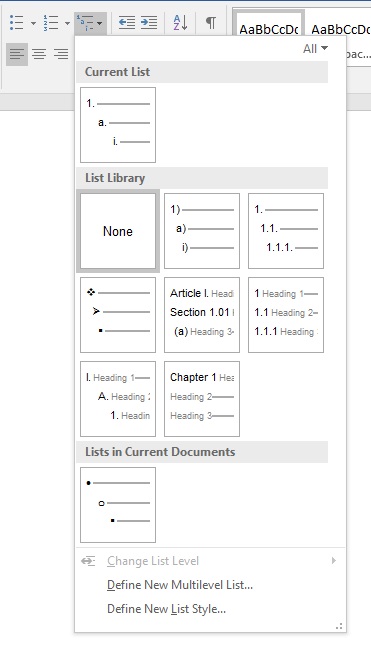
Figure: Multilevel List
Indenting a list
To indent a list, follow the steps below:
- Right-click on the list
- Click on Adjust List Indents
- Select the appropriate indent options from the dialog box
- Click Ok
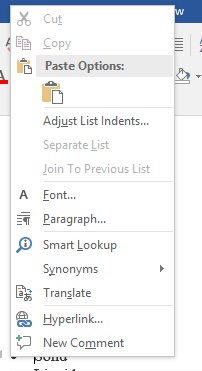
Figure: Right-click on list and choose Adjust List Indents
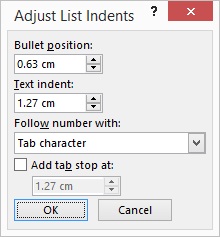
Figure: Adjust list indents
Set line spacing
A line spacing is the distance between two lines in a Microsoft Word document. You can select the line spacing before you start typing or select the text and set its line spacing.
- To set line spacing, click on the line spacing icon
 next to the text alignment icons.
 - Select the appropriate spacing you want from the drop down list or click on the Line Spacing Options to set your own spacing
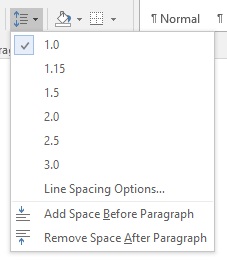
Figure: Line spacing options
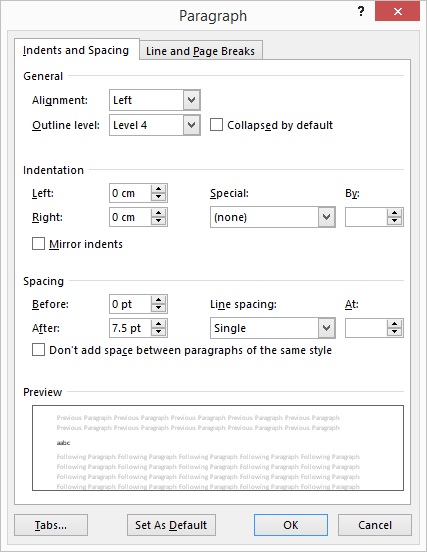
Figure: Line spacing more options
Borders and shades
You can place a border on any or all of the four sides of selected text, paragraphs, and pages. You can also add different shades to the space occupied by the selected text, paragraphs, and pages.
Add borders to text
- Select the text
- Click on the borders and shades icon

- Select the appropriate option
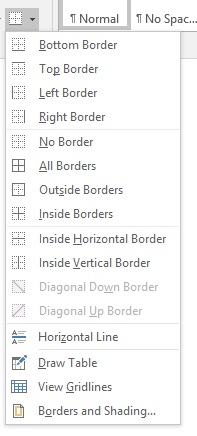
Figure: Borders and shades options

Figure: Bordered text
Add borders to page
- Click on the borders and shades icon
- Select Borders and shading
- Click on Page Border
- Select the one you want from the list of options
- You can even choose which section of the page the borders should be applied to from the applied to drop down list
- You can use the Preview section to disable or enable left, right, top or bottom borders of the page.
Figure: Bordered page
Add Shades to Text
- Select the text you want to shade
- Click on the borders and shades icon
- Select Borders and shading
- Click on Shading
- Select the patterns you want (style & color)

Figure: Shaded text