REVISION OF CSS & HTML TAGS
- Paragraph
- Image
- Table
- List
- Div
- CSS ATTRIBUTES
- Background
- Width
- Height
- Margin
- Padding
- Font-size
- Font-weight
- Display
- Block
- Inline-block
- Div Positions
- Relative
- Absolute
- Fixed
- Classes & IDs
JAVASCRIPTS
- Introduction
- Functions
Explanation to week content
Form is used to take information from a user which is later processed (stored in a database or sent to email etc)
Forms are used to build interactive web applications where a user can submit a form and be given a feedback.
Syntax
<form method=”method of the form comes here” action=”the file to process the form comes here” id=”in case you wish to give the form an id”>
form content comes here
</form>
NOTE
Form method could be either POST or GET. This will be discussed later.
The form action could be empty if the file to process the form is the same file that contains the form.
An id could be assigned to the form when using Ajax Technology to process the form. This will be discussed later.
Form Contents
The input element
<input type=”type of the input comes here” name=”name of input comes here” value=”value of input comes here” placeholder=”text to describe the expected input comes here” />
The input types can be:
| Input Type | Description |
|---|---|
| text | For taking text from a user e.g First Name, Last Name |
| number | For taking numeric inputs |
| password | For taking password inputs. Makes entered input text to be replaced by * in order for others not to see the password. |
| For taking email addresses | |
| hidden | Used to send hidden information in the form. This input type will not be visible to the user |
| file | Used to upload file(s) to the server |
| checkbox | Makes it possible for a user to tick an option |
| radio | A circular option which a user tick |
| submit | the button to submit the form |
TextArea element
The TextArea element is a rectangular box with one or more rows for taking input from the user. The input element has only one row but the TextArea element can have more than one rows.
Syntax
<TextArea name=”name of textarea comes here” rows=”number of rows come here”>Value comes here</TextArea>
NOTE:
The value can be empty. A value assigned to the TextArea is placed in between the TextArea opening and closing tags. Empty if no text is assigned to it.
The select element
The select element is used for a dropdown option. A user clicks on it and select an option from a dropdown list.
Syntax
<select name=”name of the select comes here”>
	<option value=”value of the option comes here”>Text to describe the option comes here</option>
        <option value=”value of the second option comes here”>Text to describe the second option comes here</option>
</select>
NOTE:
You can have as many options in the select as you need base on what you wish to accomplish.
To validate if a select option has been selected or not, set the value of the first option empty so that we check if the option selected is empty or not. If empty, it means the user hasn’t selected any option. The first option is the selected option by default.
For example a select element to give a user the option to select gender may be written this way:
<select name=”gender”>
	<option value=””>Select Gender</option>
            <option value=”Male”>Male</option>
            <option value=”Female”>Female</option>
</select>
Checkbox
<input type=”checkbox” name=”name of the checkbox comes here” />Text to describe the checkbox comes here
For example the checkbox to take the favorite fruits from a user could be written this way:
<p>Favorite Fruits:
<br><input type=”checkbox” name=”orange” />Orange  <input type=”checkbox” name=”mango” />Mango  <input type=”checkbox” name=”apple” />Apple
</p>
Radio Button
Radio buttons let a user select only one of a limited number of choices:
<input type=”radio” name=”name of the radio button comes here” value=”value of the radio button comes here” />Text to describe the radio button comes here.
NOTE:
The name of the radio must be the same for the options to be selected. The select only one option idea won't work for radio buttons with different names.
Thus if radio buttons have the same name, only one option of the radio button can be selected.
For example the radio button to take the gender of a user could be written this way:
<p>Gender:
<br><input type=”radio” name=”gender” value=”Male”> Male
<br><input type=”radio” name=”gender” value=”Female”> Female
</p>
If their names are different, all the options can be selected. Thus if you give the second radio name gender_2 both radios can be selected.
Thus:
<p>Gender:
<br><input type=”radio” name=”gender” value=”Male”> Male
<br><input type=”radio” name=”gender_2” value=”Female”> Female
</p>
The File Input
The file input is used to upload file or files to the server. The input elements with type="file" let the user choose one or more files from their device
Syntax
<input type=”file” name=”name of the file input comes here” />
The keyword multiple could be added in case user is allowed to select multiple files.
Syntax
<input type=”file” name=”name of the file input comes here” multiple />
In case you wish to limit the type of files a user can select, you can use the keyword accept to restrict the type of file a user can select.
<input type=”file” name=”name of the file input comes here” accept=” the file extension(s) to accept”/>
Unique file type specifiers
A unique file type specifier is a string that describes a type of file that may be selected by the user in an <input> element of type file. Each unique file type specifier may take one of the following forms:
A valid case-insensitive filename extension, starting with a period (".") character. For example: .jpg, .pdf, or .doc.
A valid MIME type string, with no extensions.
The string audio/* meaning "any audio file".
The string video/* meaning "any video file".
The string image/* meaning "any image file".
The accept attribute takes as its value a string containing one or more of these unique file type specifiers, separated by commas.
Example:
<input type="file" name=”certificate” accept="image/*,.pdf">
To use the type file to upload something to the server, you will need to add this to the form tag:
enctype="multipart/form-data"
Thus the form tag is written this way:
<form method=”POST” action=”file to process the form comes here” id=”id for the form comes here in case Ajax Technology will be used” enctype="multipart/form-data" >
We will now use the above concepts to create a form that takes a person's information and store on the database. The graphical user interface of the form is shown below:
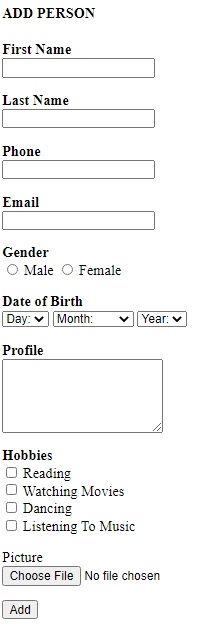
Figure: Person form
add_person.php
<h4>ADD PERSON</h4>
<form method="POST" action="process.php" id="AddPersonForm" enctype="multipart/form-data">
	<p><b>First Name</b>
	<br><input type="text" name="fn" value=""/>
	</p>
	<p><b>Last Name</b>
	<br><input type="text" name="ln" value=""/>
	</p>
	<p><b>Phone</b>
	<br><input type="text" name="phone" value=""/>
	</p>
	<p><b>Email</b>
	<br><input type="email" name="email" value=""/>
	</p>
	<p><b>Gender</b>
	<br><input type="radio" name="gender" value="Male"> Male <input type="radio" name="gender" value="Female"> Female
	</p>
	<p><b>Date of Birth</b>
	<br><select name="day">
			<option value="">Day:</option>
			<?php
			for($i=1;$i<=31;$i++){
				if($i<10){
					$d = "0".$i;
				}else{
					$d = $i;
				}
				?>
				<option value="<?php echo $d;?>"><?php echo $d;?></option>
				<?php
			}
			?>
		</select>
		<select name="month">
			<option value="">Month:</option>
			<option value="01">January</option>
			<option value="02">February</option>
			<option value="03">March</option>
			<option value="04">April</option>
			<option value="05">May</option>
			<option value="06">June</option>
			<option value="07">July</option>
			<option value="08">August</option>
			<option value="09">September</option>
			<option value="10">October</option>
			<option value="11">November</option>
			<option value="12">December</option>
		</select>
		<select name="year">
			<option value="">Year:</option>
			<?php
			$start = date('Y');
			$end = $start-150;
			for($i=$start;$i>=$end;$i--){
				?>
				<option value="<?php echo $i;?>"><?php echo $i;?></option>
				<?php
			}
			?>
		</select>
	</p>
	<p><b>Profile</b>
	<br><TextArea name="profile" rows="5"></TextArea>
	</p>
	<p><b>Hobbies</b>
	<br><input type="checkbox" name="reading"> Reading
	<br><input type="checkbox" name="movies"> Watching Movies
	<br><input type="checkbox" name="dancing"> Dancing
	<br><input type="checkbox" name="music"> Listening To Music
	</p>
	<p>Picture
	<br><input type="file" name="picture" accept="image/*"/>
	</p>
	<p><input type="submit" value="Add" /></p>
</form>
Processing Form Submission
The script to process the form is written in the php file specified in the action property of the form tag. In our form example above the processing file is process.php as in:
<form method="POST" action="process.php" id="AddPersonForm" enctype="multipart/form-data">
To check if a form has been submitted, we use isset function and the type of method in the form. For instance if the form method is POST, we can check if the form is being submitted by the php code below:
If the form method is POST
If(isset($_POST[‘name of any of the input fields except radio or checkbox in the form’])){
      //Handle your form submission here
}
If the form method is post
If(isset($_post[‘name of any of the input fields except radio or checkbox in the form’])){
	//Handle your form submission here
}
If the form method is GET
If(isset($_GET[name of any of the input fields except radio or checkbox in the form’])){
	//Handle your form submission here
}
If the form method is get
If(isset($_get[‘name of any of the input fields except radio or checkbox in the form’])){
	//Handle your form submission here
}
Thus in our above form, we can use any of these input names to check if the form is submitted:
fn,ln,phone,email,day,month,year,profile.
The if condition will therefore be:
if(isset($_POST['fn'])){


}
or
if(isset($_POST['ln'])){


}
or
if(isset($_POST['phone'])){


}
or
if(isset($_POST['email'])){


}
or
if(isset($_POST['day'])){


}
or
if(isset($_POST['month'])){


}
or
if(isset($_POST['year'])){


}
We use the $_FORM_METHOD[‘name of the input’] to get each of the input field values.
For example if the form method is POST and there is an input field by name, fn, we can get the value of the input field and assign the value to a variable by the code below:
$fn = $_POST[‘fn’];
The value of the input field, fn will be stored in the variable, $fn which we can later use in our code to process the form.
likewise in the above form, we can get the other fields values as:
$ln = $_POST[‘ln’];
$phone = $_POST[‘phone’];
$email = $_POST[‘email’];
$day = $_POST[‘day’];
$month = $_POST[‘month’];
$year = $_POST[‘year’];
$profile = $_POST[‘profile’];
Thus our process.php file script will look something like this:
<?php
if(isset($_POST['fn'])){
    $fn = $_POST['fn'];
    $ln = $_POST['ln'];
    $phone = $_POST['phone'];
    $email = $_POST['email'];
    $day = $_POST["day"];
    $month = $_POST["month"];
    $year = $_POST["year"];
    $profile = $_POST["profile"];
}
?>
NOTE
If you begin with a single quote in the square bracket ([), you must also end with a single quote and if you begin if a double quote, you must end with a double quote. So any of the quotations works but you can't mix them.
Write the above script in the process.php file and echo the fields values when the form is submitted.
process.php
<?php
if(isset($_POST['fn'])){
    $fn = $_POST['fn'];
    $ln = $_POST['ln'];
    $phone = $_POST['phone'];
    $email = $_POST['email'];
    $day = $_POST["day"];
    $month = $_POST["month"];
    $year = $_POST["year"];
    $profile = $_POST["profile"];
?>
    <p>First Name: <?php echo $fn;?></p>
    <p>Last Name: <?php echo $ln;?></p>
    <p>Phone: <?php echo $phone;?></p>
    <p>Email: <?php echo $email;?></p>
    <p>Date Of Birth: <?php echo $day."/".$month."/".$year;?></p>
    <p><b>Profile</b>
    <br><?php echo $profile;?>
    </p>
<?php
}
?>
We use the isset function to verify if a checkbox has been ticked or not. To process a checkbox, you first have to declare a variable and assign an empty text or a value to it. Then we change the value of the variable if the checkbox is checked.
Thus we can process the hobbies like this:
$reading = 0;
if(isset($_POST['reading'])){
	$reading=1;
}
$dancing = 0;
if(isset($_POST['dancing'])){
	$dancing=1;
}
$music = 0;
if(isset($_POST['music'])){
	$music=1;
}
This means that if we check the value of checkbox later and it still has the initial value, then user has not ticked on the checkbox and so we can alert the user to tick on the checkbox if it is necessary to tick.
For a radio button input, unless at least one of the radio buttons of the same name is clicked before that input will be set.
Therefore you have to declare the variable to store the value of the selected radio button and assign an empty string or a value to it.
Then you later check if it is set before getting the value and assigning to the variable.
Thus we can get the selected gender by using the code below:
$gender = "";
if(isset($_POST['gender'])){
     $gender = $_POST['gender'];
}
VALIDATING AN INPUT FIELD
To check if a value of an input field is empty, we use the function empty, thus to verify if a user has entered the first name which we have already stored in the $fn, variable, we can write the below code:
if(empty($fn)){
?>
    <p>Please enter your first name</p>
<?php
}
In a similar way if we want to verify if a user has ticked the gender, we can write the code below:
if(empty($gender)){
?>
   <p>Please select your gender</p>
<?php
}
Most often the errors are shown one at a time from the top to the bottom. The if, else if and else condition is therefore use for the validation.
We can therefore validate our form by modifying our process.php file.
<?php
if(isset($_POST['fn'])){
    $fn = $_POST['fn'];
    $ln = $_POST['ln'];
    $phone = $_POST['phone'];
    $email = $_POST['email'];
    $day = $_POST['day'];
    $month = $_POST['month'];
    $year = $_POST['year'];
    $profile = $_POST['profile'];
    $gender = "";
    if(isset($_POST['gender'])){
        $gender = $_POST['gender'];
    }
    $reading = 0;
    if(isset($_POST['reading'])){
	$reading=1;
    }
    $dancing = 0;
    if(isset($_POST['dancing'])){
	$dancing=1;
    }
    $music = 0;
    if(isset($_POST['music'])){
	$music=1;
    }
    $movies = 0;
    if(isset($_POST['movies'])){
	$movies=1;
    }
    if(empty($fn)){
    ?>
	<p>Please enter your first name</p>
    <?php
    }else if(empty($ln)){
    ?>
	<p>Please enter last name</p>
    <?php
    }else if(empty($phone)){
    ?>
	<p>Please enter phone number</p>
    <?php
    }else if(empty($email)){
    ?>
	<p>Please enter email address</p>
    <?php
    }else if(empty($gender)){
    ?>
	<p>Please select gender</p>
    <?php
    }else if((empty($day))||(empty($month))||(empty($year))){
    ?>
	<p>Please check date of birth</p>
    <?php
    }else if(empty($profile)){
    ?>
	<p>Please enter profile</p>
    <?php
    }else{
    ?>
	<p>First Name: <?php echo $fn;?></p>
	<p>Last Name: <?php echo $ln;?></p>
	<p>Phone: <?php echo $phone;?></p>
	<p>Email: <?php echo $email;?></p>
	<p>Date Of Birth: <?php echo $day."/".$month."/".$year;?></p>
	<p><b>Profile</b>
	<br><?php echo $profile;?>
	</p>
    <?php
    }
}
?>
PROCESSING A FILE INPUT
To get the file name we use the $_FILES['name of the file input comes here']['name'];
In order to make sure that there is no other file bearing the same name as the file you are uploading, you have to rename your file.
Most often files are named by a long token which the probability of it being the same for the other file will be less or impossible.
In order to rename the file, you need to get the extension of the file.
You can use the function below to get the extension of the file, by passing the name of the file to the function.
function get_extension($str)
{
	$i = strrpos($str,".");
	if (!$i) { return ""; }
	$l = strlen($str) - $i;
	$ext = substr($str,$i+1,$l);
	return $ext;
}
You can verify if the uploaded file is an image or not using the function below:
function validate_mage($file_name){
	$ext = get_extension($file_name);
	$allowed_extensions = array("jpg", "jpeg", "png","gif");
	if(in_array($ext,$allowed_extensions)){
		return true;
	}else{
		return false;
	}
}
You can also generate a token using the function below:
function generate_token() {
	$alphabet = "abcdefghijklmnopqrstuwxyzABCDEFGHIJKLMNOPQRSTUWXYZ0123456789";
	$pass = array(); //remember to declare $pass as an array
	$alphaLength = strlen($alphabet) - 1; //put the length -1 in cache
	for ($i = 0; $i < 40; $i++) {
		$n = rand(0, $alphaLength);
		$pass[] = $alphabet[$n];
	}
	return implode($pass); //turn the array into a string
}
The new name for the file can be written as:
$new_name = generate_token.”.”.$ext;
You can save the file to your server using this php function below:
copy($_FILES['name of your file input']['tmp_name'], $path_to_save_your_file);
The copy function returns true or false if the file is successfully uploaded or not.
Therefore to save the file and verify it has been saved or not at the same time, the code could be modified as:
if(copy($_FILES['name of your file input']['tmp_name'], $path_to_save_your_file)){
     //File is save so do something
}else{
     // File is not saved so give an error message.
}
The path to save the file will be the folder(s) path / file name
Thus if there is a folder call profiles in our main directory and the new name of the file is stored in $new_file variable, then the file path will be:
$path = “profiles/”.$new_file;
Let's now modify our process.php file to save person's picture on the server.
Our process.php file will there be:
<?php
function get_extension($str)
{
	$i = strrpos($str,".");
	if (!$i) { return ""; }
	$l = strlen($str) - $i;
	$ext = substr($str,$i+1,$l);
	return $ext;
}
function validate_mage($file_name){
	$ext = get_extension($file_name);
	$allowed_extensions = array("jpg", "jpeg", "png","gif");
	if(in_array($ext,$allowed_extensions)){
		return true;
	}else{
		return false;
	}
}
function generate_token() {
	$alphabet = "abcdefghijklmnopqrstuwxyzABCDEFGHIJKLMNOPQRSTUWXYZ0123456789";
	$pass = array(); //remember to declare $pass as an array
	$alphaLength = strlen($alphabet) - 1; //put the length -1 in cache
	for ($i = 0; $i < 40; $i++) {
		$n = rand(0, $alphaLength);
		$pass[] = $alphabet[$n];
	}
	return implode($pass); //turn the array into a string
}
if(isset($_POST['fn'])){
    $fn = $_POST['fn'];
    $ln = $_POST['ln'];
    $phone = $_POST['phone'];
    $email = $_POST['email'];
    $day = $_POST['day'];
    $month = $_POST['month'];
    $year = $_POST['year'];
    $profile = $_POST['profile'];
    $gender = "";
	$picture = $_FILES['picture']['name'];
    if(isset($_POST['gender'])){
        $gender = $_POST['gender'];
    }
    $reading = 0;
    if(isset($_POST['reading'])){
	$reading=1;
    }
    $dancing = 0;
    if(isset($_POST['dancing'])){
	$dancing=1;
    }
    $music = 0;
    if(isset($_POST['music'])){
	$music=1;
    }
    $movies = 0;
    if(isset($_POST['movies'])){
	$movies=1;
    }
    if(empty($fn)){
    ?>
		<p>Please enter your first name</p>
    <?php
    }else if(empty($ln)){
    ?>
		<p>Please enter last name</p>
    <?php
    }else if(empty($phone)){
    ?>
		<p>Please enter phone number</p>
    <?php
    }else if(empty($email)){
    ?>
		<p>Please enter email address</p>
    <?php
    }else if(empty($gender)){
    ?>
		<p>Please select gender</p>
    <?php
    }else if((empty($day))||(empty($month))||(empty($year))){
    ?>
		<p>Please check date of birth</p>
    <?php
    }else if(empty($profile)){
    ?>
		<p>Please enter profile</p>
    <?php
    }else if(empty($picture)){
	?>
		<p>Please upload a picture</p>
	<?php
	}else if(!validate_mage($picture)){
	?>
		<p>Please only jpg, jpeg, png or gif files allowed</p>
	<?php
	}else{
		/* Get the extension */
		$ext = get_extension($picture);
		/* Rename file */
		$image = generate_token().".".$ext;
		$path = "pictures/".$image;
		/* Note - We are saving the pictures in the pictures folder that's why you created that folder */
		/* Save Image */
		if(copy($_FILES['picture']['tmp_name'], $path)){
		?>
			<p>First Name: <?php echo $fn;?></p>
			<p>Last Name: <?php echo $ln;?></p>
			<p>Phone: <?php echo $phone;?></p>
			<p>Email: <?php echo $email;?></p>
			<p>Date Of Birth: <?php echo $day."/".$month."/".$year;?></p>
			<p><b>Profile</b>
			<br><?php echo $profile;?>
			</p>
			<p><img src="pictures/<?php echo $image;?>" width="200" /></p>
		<?php
		}else{
		?>
			<p>Image upload failed. Please try again later</p>
		<?php
		}
    ?>

    <?php
    }
}
?>
If you open the pictures folder, you should see the uploaded image(s) in it.
Checking the date
You can use the php function checkdate to verify if the selected date is valid or not. The checkdate function takes the month, the day and year as arguments and returns true if the date is valid and false if not.
Hence we can verify if the date of birth is valid or not using the code below:
if(!checkdate($month,$day,$year)){
    echo “Please check date”;
}
Now let's modify our process.php file to validate the date of birth.
<?php
function get_extension($str)
{
	$i = strrpos($str,".");
	if (!$i) { return ""; }
	$l = strlen($str) - $i;
	$ext = substr($str,$i+1,$l);
	return $ext;
}
function validate_mage($file_name){
	$ext = get_extension($file_name);
	$allowed_extensions = array("jpg", "jpeg", "png","gif");
	if(in_array($ext,$allowed_extensions)){
		return true;
	}else{
		return false;
	}
}
function generate_token() {
	$alphabet = "abcdefghijklmnopqrstuwxyzABCDEFGHIJKLMNOPQRSTUWXYZ0123456789";
	$pass = array(); //remember to declare $pass as an array
	$alphaLength = strlen($alphabet) - 1; //put the length -1 in cache
	for ($i = 0; $i < 40; $i++) {
		$n = rand(0, $alphaLength);
		$pass[] = $alphabet[$n];
	}
	return implode($pass); //turn the array into a string
}
if(isset($_POST['fn'])){
    $fn = $_POST['fn'];
    $ln = $_POST['ln'];
    $phone = $_POST['phone'];
    $email = $_POST['email'];
    $day = $_POST['day'];
    $month = $_POST['month'];
    $year = $_POST['year'];
    $profile = $_POST['profile'];
    $gender = "";
	$picture = $_FILES['picture']['name'];
    if(isset($_POST['gender'])){
        $gender = $_POST['gender'];
    }
    $reading = 0;
    if(isset($_POST['reading'])){
	$reading=1;
    }
    $dancing = 0;
    if(isset($_POST['dancing'])){
	$dancing=1;
    }
    $music = 0;
    if(isset($_POST['music'])){
	$music=1;
    }
    $movies = 0;
    if(isset($_POST['movies'])){
	$movies=1;
    }
    if(empty($fn)){
    ?>
		<p>Please enter your first name</p>
    <?php
    }else if(empty($ln)){
    ?>
		<p>Please enter last name</p>
    <?php
    }else if(empty($phone)){
    ?>
		<p>Please enter phone number</p>
    <?php
    }else if(empty($email)){
    ?>
		<p>Please enter email address</p>
    <?php
    }else if(empty($gender)){
    ?>
		<p>Please select gender</p>
    <?php
    }else if((empty($day))||(empty($month))||(empty($year))||(!checkdate($month,$day,$year))){
    ?>
		<p>Please check date of birth</p>
    <?php
    }else if(empty($profile)){
    ?>
		<p>Please enter profile</p>
    <?php
    }else if(empty($picture)){
	?>
		<p>Please upload a picture</p>
	<?php
	}else if(!validate_mage($picture)){
	?>
		<p>Please only jpg, jpeg, png or gif files allowed</p>
	<?php
	}else{
		/* Get the extension */
		$ext = get_extension($picture);
		/* Rename file */
		$image = generate_token().".".$ext;
		$path = "pictures/".$image;
		/* Note - We are saving the pictures in the pictures folder that's why you created that folder */
		/* Savel Image */
		if(copy($_FILES['picture']['tmp_name'], $path)){
		?>
			<p>First Name: <?php echo $fn;?></p>
			<p>Last Name: <?php echo $ln;?></p>
			<p>Phone: <?php echo $phone;?></p>
			<p>Email: <?php echo $email;?></p>
			<p>Date Of Birth: <?php echo $day."/".$month."/".$year;?></p>
			<p><b>Profile</b>
			<br><?php echo $profile;?>
			</p>
			<p><img src="pictures/<?php echo $image;?>" width="200" /></p>
		<?php
		}else{
		?>
			<p>Image upload failed. Please try again later</p>
		<?php
		}
    ?>

    <?php
    }
}
?>
Now let's create a table in a database to store our form information.
persons table
CREATE TABLE persons (
   firstname text,
   lastname text,
   picture text,
   phone text,
   email text,
   gender text,
   date_of_birth date,
   profile text,
   reading int NOT NULL,
   movies int NOT NULL,
   dancing int NOT NULL,
   music int NOT NULL,
   token text,
   date date,
   time timestamp NOT NULL DEFAULT CURRENT_TIMESTAMP,
  id int(11) NOT NULL AUTO_INCREMENT,
  PRIMARY KEY(`id`)
);
Now we will apply the previous week's lesson concerning, connecting to database, creating table, inserting into table and fetching table information.
Write a function which takes all the form fields and store the information in the database.
NOTE:
As I have explained in the previous week's lesson, date is stored in the database in the format year-month-day, hence you have to create a date string in that format from the day, month and year variables of the date of birth before inserting into the database.
The complete process.php file will therefore look something like this:
<?php
function get_extension($str)
{
	$i = strrpos($str,".");
	if (!$i) { return ""; }
	$l = strlen($str) - $i;
	$ext = substr($str,$i+1,$l);
	return $ext;
}
function validate_mage($file_name){
	$ext = get_extension($file_name);
	$allowed_extensions = array("jpg", "jpeg", "png","gif");
	if(in_array($ext,$allowed_extensions)){
		return true;
	}else{
		return false;
	}
}
function generate_token() {
	$alphabet = "abcdefghijklmnopqrstuwxyzABCDEFGHIJKLMNOPQRSTUWXYZ0123456789";
	$pass = array(); //remember to declare $pass as an array
	$alphaLength = strlen($alphabet) - 1; //put the length -1 in cache
	for ($i = 0; $i < 40; $i++) {
		$n = rand(0, $alphaLength);
		$pass[] = $alphabet[$n];
	}
	return implode($pass); //turn the array into a string
}
function add_person($fn,$ln,$phone,$email,$date_of_birth,$profile,$gender,$picture,$reading,$dancing,$movies,$music){
	/* Connect to the database
	   database username - > root
	   password -> empty
	   database name -> test
	*/
	$con = mysqli_connect("localhost","root","","test");
	/* Generate unique token for each person */
	$token = md5(time()).generate_token();
	/* Create the query string */
	$sql = "insert into persons(firstname,lastname,picture,phone,email,gender,date_of_birth,profile,reading,dancing,movies,music,token,date) values
	(
	'".$fn."',
	'".$ln."',
	'".$picture."',
	'".$phone."',
	'".$email."',
	'".$gender."',
	'".$date_of_birth."',
	'".$profile."',
	".$reading.",
	".$dancing.",
	".$movies.",
	".$music.",
	'".$token."',
	CURDATE()
	)
	";
	if(mysqli_query($con,$sql)){
		/* Close database connection */
		mysqli_close($con);
		return true;
	}else{
		mysqli_close($con);
		return false;
	}
}
if(isset($_POST['fn'])){
    $fn = $_POST['fn'];
    $ln = $_POST['ln'];
    $phone = $_POST['phone'];
    $email = $_POST['email'];
    $day = $_POST['day'];
    $month = $_POST['month'];
    $year = $_POST['year'];
    $profile = $_POST['profile'];
    $gender = "";
	$picture = $_FILES['picture']['name'];
    if(isset($_POST['gender'])){
        $gender = $_POST['gender'];
    }
    $reading = 0;
    if(isset($_POST['reading'])){
	$reading=1;
    }
    $dancing = 0;
    if(isset($_POST['dancing'])){
	$dancing=1;
    }
    $music = 0;
    if(isset($_POST['music'])){
	$music=1;
    }
    $movies = 0;
    if(isset($_POST['movies'])){
	$movies=1;
    }
    if(empty($fn)){
    ?>
		<p>Please enter your first name</p>
    <?php
    }else if(empty($ln)){
    ?>
		<p>Please enter last name</p>
    <?php
    }else if(empty($phone)){
    ?>
		<p>Please enter phone number</p>
    <?php
    }else if(empty($email)){
    ?>
		<p>Please enter email address</p>
    <?php
    }else if(empty($gender)){
    ?>
		<p>Please select gender</p>
    <?php
    }else if((empty($day))||(empty($month))||(empty($year))||(!checkdate($month,$day,$year))){
    ?>
		<p>Please check date of birth</p>
    <?php
    }else if(empty($profile)){
    ?>
		<p>Please enter profile</p>
    <?php
    }else if(empty($picture)){
	?>
		<p>Please upload a picture</p>
	<?php
	}else if(!validate_mage($picture)){
	?>
		<p>Please only jpg, jpeg, png or gif files allowed</p>
	<?php
	}else{
		/* Get the extension */
		$ext = get_extension($picture);
		/* Rename file */
		$image = generate_token().".".$ext;
		$path = "pictures/".$image;
		/* Note - We are saving the pictures in the pictures folder that's why you created that folder */
		/* Savel Image */
		if(copy($_FILES['picture']['tmp_name'], $path)){
			/* Since date is inserted in the year-month-day format, create the date_of_birth string */
			$date_of_birth = $year."-".$month."-".$day;
			/* Call the database function to insert the information. Check if insertion is successful to give successful feedback */
			if(add_person($fn,$ln,$phone,$email,$date_of_birth,$profile,$gender,$image,$reading,$dancing,$movies,$music)){
		?>
				<p>Information successfully recorded</p>
		<?php
			}else{
			?>
				<p>Failed adding person. Please try again later.</p>
			<?php
			}
		}else{
		?>
			<p>Image upload failed. Please try again later</p>
		<?php
		}
    ?>

    <?php
    }
}
?>
Now test your form and verify if the information have been stored on the database.
You may have realized that this method of using external file to process the form is not user friendly as user has to re-enter information if the form validation failed. Of course some browsers may keep the entered information when you click on the back arrow to return to the form page but some of the entered information maybe lost.
It is therefore more user friendly to remain on the same form page while the form is being processed (using ajax technology for external file processing the form) or storing the form values when submitted and setting the form input values with the already entered values (using the same form page to process the form).
Using Ajax
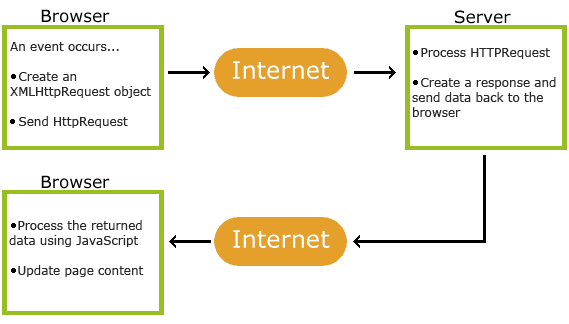
What is AJAX?
AJAX = Asynchronous JavaScript And XML.
AJAX is not a programming language.
AJAX just uses a combination of:
A browser built-in XMLHttpRequest object (to request data from a web server)
JavaScript and HTML DOM (to display or use the data)
AJAX is a misleading name. AJAX applications might use XML to transport data, but it is equally common to transport data as plain text or JSON text.
AJAX allows web pages to be updated asynchronously by exchanging data with a web server behind the scenes. This means that it is possible to update parts of a web page, without reloading the whole page.
How AJAX Works
So in our form processing we will be using jquery, ajax and json concepts to process our form. Before you can use a query function, you will have to include the jquery script in your project.
You can do this by either using a link from the jquery site or download the jquery script and refer it in your project.
For example if your jquery script is in a folder named js, you can refer to it in the head like this:
<script src="js/jquery.js" type="text/javascript"></script>
You can find the jquery script in the resource below:
Download the zipped resource files above, unzip it and place the jquery file which is in the js folder in your project. If you are using the same above src, your jquery file must be in a folder call js in the same folder as your page.
If you wish to refer to it from google, you can refer it this way:
<script src="https://ajax.googleapis.com/ajax/libs/jquery/1.8.0/jquery.min.js"></script>
NOTE:
If your web application won't be accessed on the internet, you will have to download the jquery script and include it in your project and refer to it in the head as the example above shows.
When the page loads we have to disable the submit for the forms we wish to use ajax to process so that when the submit button is clicked, the form will not be submitted.
The javascript to accomplish this task is placed in the $(document).ready function. Thus:
<script type="text/javascript">
  //<![CDATA[
  $(document).ready(function() {
	//The ajax functions to process the form(s) come(s) here
  });
</script>
You have to give the form a unique id and use the javascript function below to process the form.
$('#AddPersonForm').on('submit', function(e){
	e.preventDefault();
	$("#feedback").hide();
	$("#animation").show();
	var formData = new FormData($(this)[0]);
	$.ajax({
	  url : $(this).attr('action') || window.location.pathname,
	  type: 'POST',
	  data: formData,
	  success: function (data) {
		$("#animation").hide();
		var obj = $.parseJSON(data);
		var feedback = obj['feedback'];
		var response = obj['response'];
		if(feedback==1){
		  $("#buttons").hide();
		  $("#feedback").html("<div class='success'><p>"+response+"</p></div>");
		  $("#feedback").show();
		}else{
		  $("#feedback").html("<div class='error'><p>"+response+"</p></div>");
		  $("#feedback").show();
	        }
	},
	cache: false,
	contentType: false,
	processData: false
    });
});
The above javascript function and any other functions to process the form will be in the document.ready function. As you can see the id of the form is AddPersonForm
In order to show the user what's happening or feedback, there will be a spinning animation which will be shown once the submit button is clicked and disappears when we get feedback from the server.
We pass json data (for passing the message - response and the status of the submission - feedback ) from the server side. From the above javascript, when the form processing is successful, the feedback value is set to 1 and is 0 when the form processing isn't successful.
The message - response from the server is then displayed in a div by id feedback.
We will create a new file to process our form.
Create a new file call ajax_process.php and change the process file in our form to this file.
Using the jquery from googleapis.com and the ajax function for processing the form above, our form page will look something like this:
<html>
	<head>
		<script src="http://ajax.googleapis.com/ajax/libs/jquery/1.8.0/jquery.min.js"></script>
		<script type="text/javascript">
			//<![CDATA[
			$(document).ready(function() {
				$('#AddPersonForm').on('submit', function(e){
					e.preventDefault();
					$("#feedback").hide();
					$("#animation").show();
					var formData = new FormData($(this)[0]);
					$.ajax({
						url : $(this).attr('action') || window.location.pathname,
						type: 'POST',
						data: formData,
						success: function (data) {
							$("#animation").hide();
							var obj = $.parseJSON(data);
							var feedback = obj['feedback'];
							var response = obj['response'];
							if(feedback==1){
								$("#buttons").hide();
								$("#feedback").html("<div class='success'><p>"+response+"</p></div>");
								$("#feedback").show();
							}else{
								$("#feedback").html("<div class='error'><p>"+response+"</p></div>");
								$("#feedback").show();
							}
						},
						cache: false,
						contentType: false,
						processData: false
					});
				});
			});
		</script>
	</head>
	<body>
		<h4>ADD PERSON</h4>
		<form method="POST" action="ajax_process.php" id="AddPersonForm" enctype="multipart/form-data">
			<p><b>First Name</b>
			<br><input type="text" name="fn" value=""/>
			</p>
			<p><b>Last Name</b>
			<br><input type="text" name="ln" value=""/>
			</p>
			<p><b>Phone</b>
			<br><input type="text" name="phone" value=""/>
			</p>
			<p><b>Email</b>
			<br><input type="email" name="email" value=""/>
			</p>
			<p><b>Gender</b>
			<br><input type="radio" name="gender" value="Male"> Male <input type="radio" name="gender" value="Female"> Female
			</p>
			<p><b>Date of Birth</b>
			<br><select name="day">
					<option value="">Day:</option>
					<?php
					for($i=1;$i<=31;$i++){
						if($i<10){
							$d = "0".$i;
						}else{
							$d = $i;
						}
						?>
						<option value="<?php echo $d;?>"><?php echo $d;?></option>
						<?php
					}
					?>
				</select>
				<select name="month">
					<option value="">Month:</option>
					<option value="01">January</option>
					<option value="02">February</option>
					<option value="03">March</option>
					<option value="04">April</option>
					<option value="05">May</option>
					<option value="06">June</option>
					<option value="07">July</option>
					<option value="08">August</option>
					<option value="09">September</option>
					<option value="10">October</option>
					<option value="11">November</option>
					<option value="12">December</option>
				</select>
				<select name="year">
					<option value="">Year:</option>
					<?php
					$start = date('Y');
					$end = $start-150;
					for($i=$start;$i>=$end;$i--){
						?>
						<option value="<?php echo $i;?>"><?php echo $i;?></option>
						<?php
					}
					?>
				</select>
			</p>
			<p><b>Profile</b>
			<br><TextArea name="profile" rows="5"></TextArea>
			</p>
			<p><b>Hobbies</b>
			<br><input type="checkbox" name="reading"> Reading
			<br><input type="checkbox" name="movies"> Watching Movies
			<br><input type="checkbox" name="dancing"> Dancing
			<br><input type="checkbox" name="music"> Listening To Music
			</p>
			<p>Picture
			<br><input type="file" name="picture" accept="image/*"/>
			</p>
			<p><input type="submit" value="Add" /></p>
		</form>
	</body>
</html>
Since we are using the jquery script from googleapis.com, you have to be connected to the internet. Connect to the internet if you are not and run your form page.
If you click on the submit button and the form isn't submitted (didn't open the processing file, ajax_process.php), then you are on the right path.
We now have to write css to show a spinning animation, show error and success. Let's add the css below to the form page.
input:focus,button:focus,TextArea:focus,select:focus{
	outline:none;
}
input[type="text"],input[type="email"],input[type="password"]{
    display: block;
    font-family: 'Open Sans Light', 'Open Sans', Arial, Helvetica, sans-serif;
	font-weight: 200;
	border: 1px solid #BEBEBE;
	color: #4A4A4A;
	font-size: 14px;
	padding: 5px;
	margin-top:5px;
}
input[type="text"]::placeholder,input[type="email"]::placeholder, input[type="password"]::placeholder{
    color: #6c757d;
    opacity: 1;
}
select{
    color: #4A4A4A;
    font-size: 14px;
    padding: 5px;
}
#animation{
	display:none;
}
.spinner {
  height: 10px;
  width: 10px;
  animation: rotate 0.8s infinite linear;
  border: 8px solid #7CC1E6;
  border-right-color: transparent;
  border-radius: 50%;
  margin-left:auto;
  margin-right:auto;
}

@keyframes rotate {
  0%    { transform: rotate(0deg); }
  100%  { transform: rotate(360deg); }
}
.information p, .success p, .warning p,.validation p,.error p{
	margin-top: 5px;
}
.error {
        color: #D8000C;
	background-color: #FFBABA;
	background-image: url('images/error.png');
}
.information {
	color: #00529B;
	background-color: #BDE5F8;
	background-image: url('images/info.png');
}
.success {
	color: #4F8A10;
	background-color: #88ffd1;
	background-image:url('images/success.png');
}
.warning {
	color: #9F6000;
	background-color: #FEEFB3;
	background-image: url('images/warning.png');
}
.error,.success,.warning,.information {
	margin: 10px 0px;
	padding: 9px 10px 10px 50px;
	background-repeat: no-repeat;
	background-position: 10px center;
}
NOTE
The error and success class above used png icon which can be found in a folder call images. In the resources file you were asked to download, those images are in the images folder. You can copy and paste that folder in your project.
Now we will also have to have the divs for the feedback and the spinner animation.
Below your form or where you wish to show the feedback and the spinning animation, add the div and refer to the feedback by an id and the spinner by a class.
The css above contains a spinner class for showing spinning animation. I will show the feedback and the spinning animation below the submit button, hence I will add the code shown below below the closing form tag.
<div class="spinner"></div>
<div id="feedback"></div>
Our form page will therefore be:
<html>
	<head>
		<script src="http://ajax.googleapis.com/ajax/libs/jquery/1.8.0/jquery.min.js"></script>
		<script type="text/javascript">
			//<![CDATA[
			$(document).ready(function() {
				$('#AddPersonForm').on('submit', function(e){
					e.preventDefault();
					$("#feedback").hide();
					$("#animation").show();
					var formData = new FormData($(this)[0]);
					$.ajax({
						url : $(this).attr('action') || window.location.pathname,
						type: 'POST',
						data: formData,
						success: function (data) {
							$("#animation").hide();
							var obj = $.parseJSON(data);
							var feedback = obj['feedback'];
							var response = obj['response'];
							if(feedback==1){
								$("#buttons").hide();
								$("#feedback").html("<div class='success'><p>"+response+"</p></div>");
								$("#feedback").show();
							}else{
								$("#feedback").html("<div class='error'><p>"+response+"</p></div>");
								$("#feedback").show();
							}
						},
						cache: false,
						contentType: false,
						processData: false
					});
				});
			});
		</script>
		<style>
			input:focus,button:focus,TextArea:focus,select:focus{
				outline:none;
			}
			input[type="text"],input[type="email"],input[type="password"]{
				display: block;
				font-family: 'Open Sans Light', 'Open Sans', Arial, Helvetica, sans-serif;
				font-weight: 200;
				border: 1px solid #BEBEBE;
				color: #4A4A4A;
				font-size: 14px;
				padding: 5px;
				margin-top:5px;
			}
			input[type="text"]::placeholder,input[type="email"]::placeholder, input[type="password"]::placeholder{
				color: #6c757d;
				opacity: 1;
			}
			select{
				color: #4A4A4A;
				font-size: 14px;
				padding: 5px;
			}
			#animation{
				display:none;
			}
			.spinner {
			  height: 10px;
			  width: 10px;
			  animation: rotate 0.8s infinite linear;
			  border: 8px solid #7CC1E6;
			  border-right-color: transparent;
			  border-radius: 50%;
			  margin-left:auto;
			  margin-right:auto;
			}

			@keyframes rotate {
			  0%    { transform: rotate(0deg); }
			  100%  { transform: rotate(360deg); }
			}
			.information p, .success p, .warning p,.validation p,.error p{
				margin-top: 5px;
			}
                        .error {
				color: #D8000C;
				background-color: #FFBABA;
				background-image: url('images/error.png');
			}
			.information {
				color: #00529B;
				background-color: #BDE5F8;
				background-image: url('images/info.png');
			}
			.success {
				color: #4F8A10;
				background-color: #88ffd1;
				background-image:url('images/success.png');
			}
			.warning {
				color: #9F6000;
				background-color: #FEEFB3;
				background-image: url('images/warning.png');
			}
			.error,.success,.warning,.information {
				margin: 10px 0px;
				padding: 9px 10px 10px 50px;
				background-repeat: no-repeat;
				background-position: 10px center;
			}
		</style>
	</head>
	<body>
		<h4>ADD PERSON</h4>
		<form method="POST" action="ajax_process.php" id="AddPersonForm" enctype="multipart/form-data">
			<p><b>First Name</b>
			<br><input type="text" name="fn" value=""/>
			</p>
			<p><b>Last Name</b>
			<br><input type="text" name="ln" value=""/>
			</p>
			<p><b>Phone</b>
			<br><input type="text" name="phone" value=""/>
			</p>
			<p><b>Email</b>
			<br><input type="email" name="email" value=""/>
			</p>
			<p><b>Gender</b>
			<br><input type="radio" name="gender" value="Male"> Male <input type="radio" name="gender" value="Female"> Female
			</p>
			<p><b>Date of Birth</b>
			<br><select name="day">
					<option value="">Day:</option>
					<?php
					for($i=1;$i<=31;$i++){
						if($i<10){
							$d = "0".$i;
						}else{
							$d = $i;
						}
						?>
						<option value="<?php echo $d;?>"><?php echo $d;?></option>
						<?php
					}
					?>
				</select>
				<select name="month">
					<option value="">Month:</option>
					<option value="01">January</option>
					<option value="02">February</option>
					<option value="03">March</option>
					<option value="04">April</option>
					<option value="05">May</option>
					<option value="06">June</option>
					<option value="07">July</option>
					<option value="08">August</option>
					<option value="09">September</option>
					<option value="10">October</option>
					<option value="11">November</option>
					<option value="12">December</option>
				</select>
				<select name="year">
					<option value="">Year:</option>
					<?php
					$start = date('Y');
					$end = $start-150;
					for($i=$start;$i>=$end;$i--){
						?>
						<option value="<?php echo $i;?>"><?php echo $i;?></option>
						<?php
					}
					?>
				</select>
			</p>
			<p><b>Profile</b>
			<br><TextArea name="profile" rows="5"></TextArea>
			</p>
			<p><b>Hobbies</b>
			<br><input type="checkbox" name="reading"> Reading
			<br><input type="checkbox" name="movies"> Watching Movies
			<br><input type="checkbox" name="dancing"> Dancing
			<br><input type="checkbox" name="music"> Listening To Music
			</p>
			<p>Picture
			<br><input type="file" name="picture" accept="image/*"/>
			</p>
			<p><input type="submit" value="Add" /></p>
		</form>
		<div class="spinner"></div>
		<div id="feedback"></div>
	</body>
</html>
If you refresh your form page, you will realize that the spinner keeps spinning even if the form hasn't been submitted yet. We will therefore have to put it in a div which will be given the display property to none so that it will not show at the time the page is loaded.
Then when the submit button is clicked, we show the div. In the form processing jquery function, this div is given an id of animation.
And in the css style, this animation id is given a display property to none. Create a new div and give it an id animation and place your spinner div in it so that it hides the spinner div when the page is loaded.
And when the form is submitted to is shown so that the spinner can be seen. When the server response arrives the animation div is then hidden so that the spinner is no longer visible as you may have noticed in the jquery form processing function above.
Our updated form page will therefore be:
<html>
	<head>
		<script src="http://ajax.googleapis.com/ajax/libs/jquery/1.8.0/jquery.min.js"></script>
		<script type="text/javascript">
			//<![CDATA[
			$(document).ready(function() {
				$('#AddPersonForm').on('submit', function(e){
					e.preventDefault();
					$("#feedback").hide();
					$("#animation").show();
					var formData = new FormData($(this)[0]);
					$.ajax({
						url : $(this).attr('action') || window.location.pathname,
						type: 'POST',
						data: formData,
						success: function (data) {
							$("#animation").hide();
							var obj = $.parseJSON(data);
							var feedback = obj['feedback'];
							var response = obj['response'];
							if(feedback==1){
								$("#buttons").hide();
								$("#feedback").html("<div class='success'><p>"+response+"</p></div>");
								$("#feedback").show();
							}else{
								$("#feedback").html("<div class='error'><p>"+response+"</p></div>");
								$("#feedback").show();
							}
						},
						cache: false,
						contentType: false,
						processData: false
					});
				});
			});
		</script>
		<style>
			input:focus,button:focus,TextArea:focus,select:focus{
				outline:none;
			}
			input[type="text"],input[type="email"],input[type="password"]{
				display: block;
				font-family: 'Open Sans Light', 'Open Sans', Arial, Helvetica, sans-serif;
				font-weight: 200;
				border: 1px solid #BEBEBE;
				color: #4A4A4A;
				font-size: 14px;
				padding: 5px;
				margin-top:5px;
			}
			input[type="text"]::placeholder,input[type="email"]::placeholder, input[type="password"]::placeholder{
				color: #6c757d;
				opacity: 1;
			}
			select{
				color: #4A4A4A;
				font-size: 14px;
				padding: 5px;
			}
			#animation{
				display:none;
			}
			.spinner {
			  height: 10px;
			  width: 10px;
			  animation: rotate 0.8s infinite linear;
			  border: 8px solid #7CC1E6;
			  border-right-color: transparent;
			  border-radius: 50%;
			  margin-left:auto;
			  margin-right:auto;
			}

			@keyframes rotate {
			  0%    { transform: rotate(0deg); }
			  100%  { transform: rotate(360deg); }
			}
			.information p, .success p, .warning p,.validation p,.error p{
				margin-top: 5px;
			}
                        .error {
				color: #D8000C;
				background-color: #FFBABA;
				background-image: url('images/error.png');
			}
			.information {
				color: #00529B;
				background-color: #BDE5F8;
				background-image: url('images/info.png');
			}
			.success {
				color: #4F8A10;
				background-color: #88ffd1;
				background-image:url('images/success.png');
			}
			.warning {
				color: #9F6000;
				background-color: #FEEFB3;
				background-image: url('images/warning.png');
			}
			.error,.success,.warning,.information {
				margin: 10px 0px;
				padding: 9px 10px 10px 50px;
				background-repeat: no-repeat;
				background-position: 10px center;
			}
		</style>
	</head>
	<body>
		<h4>ADD PERSON</h4>
		<form method="POST" action="ajax_process.php" id="AddPersonForm" enctype="multipart/form-data">
			<p><b>First Name</b>
			<br><input type="text" name="fn" value=""/>
			</p>
			<p><b>Last Name</b>
			<br><input type="text" name="ln" value=""/>
			</p>
			<p><b>Phone</b>
			<br><input type="text" name="phone" value=""/>
			</p>
			<p><b>Email</b>
			<br><input type="email" name="email" value=""/>
			</p>
			<p><b>Gender</b>
			<br><input type="radio" name="gender" value="Male"> Male <input type="radio" name="gender" value="Female"> Female
			</p>
			<p><b>Date of Birth</b>
			<br><select name="day">
					<option value="">Day:</option>
					<?php
					for($i=1;$i<=31;$i++){
						if($i<10){
							$d = "0".$i;
						}else{
							$d = $i;
						}
						?>
						<option value="<?php echo $d;?>"><?php echo $d;?></option>
						<?php
					}
					?>
				</select>
				<select name="month">
					<option value="">Month:</option>
					<option value="01">January</option>
					<option value="02">February</option>
					<option value="03">March</option>
					<option value="04">April</option>
					<option value="05">May</option>
					<option value="06">June</option>
					<option value="07">July</option>
					<option value="08">August</option>
					<option value="09">September</option>
					<option value="10">October</option>
					<option value="11">November</option>
					<option value="12">December</option>
				</select>
				<select name="year">
					<option value="">Year:</option>
					<?php
					$start = date('Y');
					$end = $start-150;
					for($i=$start;$i>=$end;$i--){
						?>
						<option value="<?php echo $i;?>"><?php echo $i;?></option>
						<?php
					}
					?>
				</select>
			</p>
			<p><b>Profile</b>
			<br><TextArea name="profile" rows="5"></TextArea>
			</p>
			<p><b>Hobbies</b>
			<br><input type="checkbox" name="reading"> Reading
			<br><input type="checkbox" name="movies"> Watching Movies
			<br><input type="checkbox" name="dancing"> Dancing
			<br><input type="checkbox" name="music"> Listening To Music
			</p>
			<p>Picture
			<br><input type="file" name="picture" accept="image/*"/>
			</p>
			<p><input type="submit" value="Add" /></p>
		</form>
		<div id="animation"><div class="spinner"></div></div>
		<div id="feedback"></div>
	</body>
</html>
Now refresh your form page. You will realize that the spinner no longer shows and when the submit button is clicked, the spinner starts to show.
The spinner is centered in the div it is placed. If you want it to be shown within a shorter width, you can give the animation div a width so that the spinner is centered in that width.
You can modify the animation css and give it a width of 200px and refresh the page to see the effect.
The updated form page should look something similar to this:
<html>
	<head>
		<script src="http://ajax.googleapis.com/ajax/libs/jquery/1.8.0/jquery.min.js"></script>
		<script type="text/javascript">
			//<![CDATA[
			$(document).ready(function() {
				$('#AddPersonForm').on('submit', function(e){
					e.preventDefault();
					$("#feedback").hide();
					$("#animation").show();
					var formData = new FormData($(this)[0]);
					$.ajax({
						url : $(this).attr('action') || window.location.pathname,
						type: 'POST',
						data: formData,
						success: function (data) {
							$("#animation").hide();
							var obj = $.parseJSON(data);
							var feedback = obj['feedback'];
							var response = obj['response'];
							if(feedback==1){
								$("#buttons").hide();
								$("#feedback").html("<div class='success'><p>"+response+"</p></div>");
								$("#feedback").show();
							}else{
								$("#feedback").html("<div class='error'><p>"+response+"</p></div>");
								$("#feedback").show();
							}
						},
						cache: false,
						contentType: false,
						processData: false
					});
				});
			});
		</script>
		<style>
			input:focus,button:focus,TextArea:focus,select:focus{
				outline:none;
			}
			input[type="text"],input[type="email"],input[type="password"]{
				display: block;
				font-family: 'Open Sans Light', 'Open Sans', Arial, Helvetica, sans-serif;
				font-weight: 200;
				border: 1px solid #BEBEBE;
				color: #4A4A4A;
				font-size: 14px;
				padding: 5px;
				margin-top:5px;
			}
			input[type="text"]::placeholder,input[type="email"]::placeholder, input[type="password"]::placeholder{
				color: #6c757d;
				opacity: 1;
			}
			select{
				color: #4A4A4A;
				font-size: 14px;
				padding: 5px;
			}
			#animation{
				display:none;
				width:200px;
			}
			.spinner {
			  height: 10px;
			  width: 10px;
			  animation: rotate 0.8s infinite linear;
			  border: 8px solid #7CC1E6;
			  border-right-color: transparent;
			  border-radius: 50%;
			  margin-left:auto;
			  margin-right:auto;
			}

			@keyframes rotate {
			  0%    { transform: rotate(0deg); }
			  100%  { transform: rotate(360deg); }
			}
			.information p, .success p, .warning p,.validation p,.error p{
				margin-top: 5px;
			}
                        .error {
				color: #D8000C;
				background-color: #FFBABA;
				background-image: url('images/error.png');
			}
			.information {
				color: #00529B;
				background-color: #BDE5F8;
				background-image: url('images/info.png');
			}
			.success {
				color: #4F8A10;
				background-color: #88ffd1;
				background-image:url('images/success.png');
			}
			.warning {
				color: #9F6000;
				background-color: #FEEFB3;
				background-image: url('images/warning.png');
			}
			.error,.success,.warning,.information {
				margin: 10px 0px;
				padding: 9px 10px 10px 50px;
				background-repeat: no-repeat;
				background-position: 10px center;
			}
		</style>
	</head>
	<body>
		<h4>ADD PERSON</h4>
		<form method="POST" action="ajax_process.php" id="AddPersonForm" enctype="multipart/form-data">
			<p><b>First Name</b>
			<br><input type="text" name="fn" value=""/>
			</p>
			<p><b>Last Name</b>
			<br><input type="text" name="ln" value=""/>
			</p>
			<p><b>Phone</b>
			<br><input type="text" name="phone" value=""/>
			</p>
			<p><b>Email</b>
			<br><input type="email" name="email" value=""/>
			</p>
			<p><b>Gender</b>
			<br><input type="radio" name="gender" value="Male"> Male <input type="radio" name="gender" value="Female"> Female
			</p>
			<p><b>Date of Birth</b>
			<br><select name="day">
					<option value="">Day:</option>
					<?php
					for($i=1;$i<=31;$i++){
						if($i<10){
							$d = "0".$i;
						}else{
							$d = $i;
						}
						?>
						<option value="<?php echo $d;?>"><?php echo $d;?></option>
						<?php
					}
					?>
				</select>
				<select name="month">
					<option value="">Month:</option>
					<option value="01">January</option>
					<option value="02">February</option>
					<option value="03">March</option>
					<option value="04">April</option>
					<option value="05">May</option>
					<option value="06">June</option>
					<option value="07">July</option>
					<option value="08">August</option>
					<option value="09">September</option>
					<option value="10">October</option>
					<option value="11">November</option>
					<option value="12">December</option>
				</select>
				<select name="year">
					<option value="">Year:</option>
					<?php
					$start = date('Y');
					$end = $start-150;
					for($i=$start;$i>=$end;$i--){
						?>
						<option value="<?php echo $i;?>"><?php echo $i;?></option>
						<?php
					}
					?>
				</select>
			</p>
			<p><b>Profile</b>
			<br><TextArea name="profile" rows="5"></TextArea>
			</p>
			<p><b>Hobbies</b>
			<br><input type="checkbox" name="reading"> Reading
			<br><input type="checkbox" name="movies"> Watching Movies
			<br><input type="checkbox" name="dancing"> Dancing
			<br><input type="checkbox" name="music"> Listening To Music
			</p>
			<p>Picture
			<br><input type="file" name="picture" accept="image/*"/>
			</p>
			<p><input type="submit" value="Add" /></p>
		</form>
		<div id="animation"><div class="spinner"></div></div>
		<div id="feedback"></div>
	</body>
</html>
We can now code the processing file (ajax_process.php). We will modify our previously written process.php file. You can copy the process.php code and paste in our ajax_process.php file as we make some modifications.
As explained above, we will pass the data from the server as json. Our data which communicates with our ajax script will pass the response (message - error or success) and the feedback value to know whethere we should show error and success.
Introduction To JSON
JSON: JavaScript Object Notation.
JSON is a syntax for storing and exchanging data.
JSON is text, written with JavaScript object notation.
Exchanging Data
When exchanging data between a browser and a server, the data can only be text.
JSON is text, and we can convert any JavaScript object into JSON, and send JSON to the server.
We can also convert any JSON received from the server into JavaScript objects.
This way we can work with the data as JavaScript objects, with no complicated parsing and translations.
Sending Data
We create an array in the form of key and value and generate json format using the php function, json_encode.
Therefore in our processing file we will send the json data by this line of code:
echo json_encode(array("feedback"=>$feedback,"response"=>$response));
Where the $feedback variable will contain our feedback value to know what to do at the client side and the $response variable
which contains the message to display at the client side.
Receiving Data
If you receive data in JSON format, you can convert it into a JavaScript object:
Example
var myJSON = '{"name":"John", "age":31, "city":"New York"}';
var myObj = JSON.parse(myJSON);
document.getElementById("demo").innerHTML = myObj.name;
As you may have realized, we retrieved the response and feedback data in the jquery form processing function by the code:
var obj = $.parseJSON(data);
var feedback = obj['feedback'];
var response = obj['response'];
where the data is the json text sent by the processing file, the feedback and response are the key in the json encoded array.
Let's now modify the script for processing the form in the ajax_process.php file. We will declare two variables $response and $feedback. We will initialized our response variable with empty string and the feedback variable with 0.
$response = "";
$feedback = 0;
All the places where we where displaying error messages, we will assign the error messages to our response variable. When the forum process is successful, we will assign 1 to the feedback.
Our modified script for processing the form will therefore be:
ajax_process.php
<?php
function get_extension($str)
{
	$i = strrpos($str,".");
	if (!$i) { return ""; }
	$l = strlen($str) - $i;
	$ext = substr($str,$i+1,$l);
	return $ext;
}
function validate_mage($file_name){
	$ext = get_extension($file_name);
	$allowed_extensions = array("jpg", "jpeg", "png","gif");
	if(in_array($ext,$allowed_extensions)){
		return true;
	}else{
		return false;
	}
}
function generate_token() {
	$alphabet = "abcdefghijklmnopqrstuwxyzABCDEFGHIJKLMNOPQRSTUWXYZ0123456789";
	$pass = array(); //remember to declare $pass as an array
	$alphaLength = strlen($alphabet) - 1; //put the length -1 in cache
	for ($i = 0; $i < 40; $i++) {
		$n = rand(0, $alphaLength);
		$pass[] = $alphabet[$n];
	}
	return implode($pass); //turn the array into a string
}
function add_person($fn,$ln,$phone,$email,$date_of_birth,$profile,$gender,$picture,$reading,$dancing,$movies,$music){
	/* Connect to the database
	   database username - > root
	   password -> empty
	   database name -> test
	*/
	$con = mysqli_connect("localhost","root","","test");
	/* Generate unique token for each person */
	$token = md5(time()).generate_token();
	/* Create the query string */
	$sql = "insert into persons(firstname,lastname,picture,phone,email,gender,date_of_birth,profile,reading,dancing,movies,music,token,date) values
	(
	'".$fn."',
	'".$ln."',
	'".$picture."',
	'".$phone."',
	'".$email."',
	'".$gender."',
	'".$date_of_birth."',
	'".$profile."',
	".$reading.",
	".$dancing.",
	".$movies.",
	".$music.",
	'".$token."',
	CURDATE()
	)
	";
	if(mysqli_query($con,$sql)){
		/* Close database connection */
		mysqli_close($con);
		return true;
	}else{
		mysqli_close($con);
		return false;
	}
}
$response = "";
$feedback = 0;
if(isset($_POST['fn'])){
    $fn = $_POST['fn'];
    $ln = $_POST['ln'];
    $phone = $_POST['phone'];
    $email = $_POST['email'];
    $day = $_POST['day'];
    $month = $_POST['month'];
    $year = $_POST['year'];
    $profile = $_POST['profile'];
    $gender = "";
	$picture = $_FILES['picture']['name'];
    if(isset($_POST['gender'])){
        $gender = $_POST['gender'];
    }
    $reading = 0;
    if(isset($_POST['reading'])){
	$reading=1;
    }
    $dancing = 0;
    if(isset($_POST['dancing'])){
	$dancing=1;
    }
    $music = 0;
    if(isset($_POST['music'])){
	$music=1;
    }
    $movies = 0;
    if(isset($_POST['movies'])){
	$movies=1;
    }
    if(empty($fn)){
		$response = "Please enter your first name";
    }else if(empty($ln)){
		$response = "Please enter last name";
    }else if(empty($phone)){
		$response = "Please enter phone number";
    }else if(empty($email)){
		$response = "Please enter email address";
    }else if(empty($gender)){
		$response = "Please select gender";
    }else if((empty($day))||(empty($month))||(empty($year))||(!checkdate($month,$day,$year))){
		$response = "Please check date of birth";
    }else if(empty($profile)){
		$response = "Please enter profile";
    }else if(empty($picture)){
		$response = "Please upload a picture";
	}else if(!validate_mage($picture)){
		$response = "Please only jpg, jpeg, png or gif files allowed";
	}else{
		/* Get the extension */
		$ext = get_extension($picture);
		/* Rename file */
		$image = generate_token().".".$ext;
		$path = "pictures/".$image;
		/* Note - We are saving the pictures in the pictures folder that's why you created that folder */
		/* Savel Image */
		if(copy($_FILES['picture']['tmp_name'], $path)){
			/* Since date is inserted in the year-month-day format, create the date_of_birth string */
			$date_of_birth = $year."-".$month."-".$day;
			/* Call the database function to insert the information. Check if insertion is successful to give successful feedback */
			if(add_person($fn,$ln,$phone,$email,$date_of_birth,$profile,$gender,$image,$reading,$dancing,$movies,$music)){
				$response = "Information successfully recorded";
				$feedback = 1;
			}else{
				$response = "Failed adding person. Please try again later.";
			}
		}else{
			$response = "Image upload failed. Please try again later";
		}
    }
}
/* Send json information */
echo json_encode(array("feedback"=>$feedback,"response"=>$response));
?>
Now if you run your form page, you should be seeing error messages when fields are not filled. The feedback div takes the entire width and so if you wish to have smaller width, you have to give the feedback div dimension.
For instance if we want the feedback div to be 400px, we can add the style below:
#feedback{
    width:400px;
}
Our complete form page will therefore be:
<html>
	<head>
		<script src="http://ajax.googleapis.com/ajax/libs/jquery/1.8.0/jquery.min.js"></script>
		<script type="text/javascript">
			//<![CDATA[
			$(document).ready(function() {
				$('#AddPersonForm').on('submit', function(e){
					e.preventDefault();
					$("#feedback").hide();
					$("#animation").show();
					var formData = new FormData($(this)[0]);
					$.ajax({
						url : $(this).attr('action') || window.location.pathname,
						type: 'POST',
						data: formData,
						success: function (data) {
							$("#animation").hide();
							var obj = $.parseJSON(data);
							var feedback = obj['feedback'];
							var response = obj['response'];
							if(feedback==1){
								$("#buttons").hide();
								$("#feedback").html("<div class='success'><p>"+response+"</p></div>");
								$("#feedback").show();
							}else{
								$("#feedback").html("<div class='error'><p>"+response+"</p></div>");
								$("#feedback").show();
							}
						},
						cache: false,
						contentType: false,
						processData: false
					});
				});
			});
		</script>
		<style>
			input:focus,button:focus,TextArea:focus,select:focus{
				outline:none;
			}
			input[type="text"],input[type="email"],input[type="password"]{
				display: block;
				font-family: 'Open Sans Light', 'Open Sans', Arial, Helvetica, sans-serif;
				font-weight: 200;
				border: 1px solid #BEBEBE;
				color: #4A4A4A;
				font-size: 14px;
				padding: 5px;
				margin-top:5px;
			}
			input[type="text"]::placeholder,input[type="email"]::placeholder, input[type="password"]::placeholder{
				color: #6c757d;
				opacity: 1;
			}
			select{
				color: #4A4A4A;
				font-size: 14px;
				padding: 5px;
			}
			#animation{
				display:none;
				width:200px;
			}
			.spinner {
			  height: 10px;
			  width: 10px;
			  animation: rotate 0.8s infinite linear;
			  border: 8px solid #7CC1E6;
			  border-right-color: transparent;
			  border-radius: 50%;
			  margin-left:auto;
			  margin-right:auto;
			}

			@keyframes rotate {
			  0%    { transform: rotate(0deg); }
			  100%  { transform: rotate(360deg); }
			}
			.information p, .success p, .warning p,.validation p,.error p{
				margin-top: 5px;
			}
			.error {
				color: #D8000C;
				background-color: #FFBABA;
				background-image: url('images/error.png');
			}
			.information {
				color: #00529B;
				background-color: #BDE5F8;
				background-image: url('images/info.png');
			}
			.success {
				color: #4F8A10;
				background-color: #88ffd1;
				background-image:url('images/success.png');
			}
			.warning {
				color: #9F6000;
				background-color: #FEEFB3;
				background-image: url('images/warning.png');
			}
			.error,.success,.warning,.information {
				margin: 10px 0px;
				padding: 9px 10px 10px 50px;
				background-repeat: no-repeat;
				background-position: 10px center;
			}
			#feedback{
				width:400px;
			}
		</style>
	</head>
	<body>
		<h4>ADD PERSON</h4>
		<form method="POST" action="ajax_process.php" id="AddPersonForm" enctype="multipart/form-data">
			<p><b>First Name</b>
			<br><input type="text" name="fn" value=""/>
			</p>
			<p><b>Last Name</b>
			<br><input type="text" name="ln" value=""/>
			</p>
			<p><b>Phone</b>
			<br><input type="text" name="phone" value=""/>
			</p>
			<p><b>Email</b>
			<br><input type="email" name="email" value=""/>
			</p>
			<p><b>Gender</b>
			<br><input type="radio" name="gender" value="Male"> Male <input type="radio" name="gender" value="Female"> Female
			</p>
			<p><b>Date of Birth</b>
			<br><select name="day">
					<option value="">Day:</option>
					<?php
					for($i=1;$i<=31;$i++){
						if($i<10){
							$d = "0".$i;
						}else{
							$d = $i;
						}
						?>
						<option value="<?php echo $d;?>"><?php echo $d;?></option>
						<?php
					}
					?>
				</select>
				<select name="month">
					<option value="">Month:</option>
					<option value="01">January</option>
					<option value="02">February</option>
					<option value="03">March</option>
					<option value="04">April</option>
					<option value="05">May</option>
					<option value="06">June</option>
					<option value="07">July</option>
					<option value="08">August</option>
					<option value="09">September</option>
					<option value="10">October</option>
					<option value="11">November</option>
					<option value="12">December</option>
				</select>
				<select name="year">
					<option value="">Year:</option>
					<?php
					$start = date('Y');
					$end = $start-150;
					for($i=$start;$i>=$end;$i--){
						?>
						<option value="<?php echo $i;?>"><?php echo $i;?></option>
						<?php
					}
					?>
				</select>
			</p>
			<p><b>Profile</b>
			<br><TextArea name="profile" rows="5"></TextArea>
			</p>
			<p><b>Hobbies</b>
			<br><input type="checkbox" name="reading"> Reading
			<br><input type="checkbox" name="movies"> Watching Movies
			<br><input type="checkbox" name="dancing"> Dancing
			<br><input type="checkbox" name="music"> Listening To Music
			</p>
			<p>Picture
			<br><input type="file" name="picture" accept="image/*"/>
			</p>
			<p><input type="submit" value="Add" /></p>
		</form>
		<div id="animation"><div class="spinner"></div></div>
		<div id="feedback"></div>
	</body>
</html>
PROCESSING FORM BY THE SAME FORM PAGE
To process the form by the same php form page, the action attribute in the form will either be the same file name or empty.
To check if the form is submitted we still use the isset function we have addressed already.
In order to keep the form data in case the form validation failed, we first initialize our form data variables with empty string or assign initial value.
This is done before the code for checking if the form has been submitted. If you do not initialize these variables and you use them to set your form inputs, some php servers will throw an error.
NOTE:
These form data initialization should come before the code for processing the form.
If you place the form data initialization below the code for processing the form, the values retrieved from the submitted form will therefore be overwritten by your initialization values.
Once the form is submitted, we assigned the input data the user submitted to those form data variables.
In the form input we set the values to their corresponding variables.
Remember to assign a value to a text, email, number, password input types the value attribute is used.
For select option, the selected attribute is used in the option tag to make an option being selected among the dropdown list.
For a checkbox or radio inputs, the checked attribute is used to make them to be ticked. You will have to write a function which compares the values of these input to the one obtained when the form is submitted. When these values are the same, then it means, that dropdown option is selected or checkbox or radio button ticked.
We can use the function below for the select:
function option_selected($value,$comp){
   if($value==$comp){
        return "selected";
   }else{
        return "";
   }
}
We can use the function below for the checkbox or radio:
function is_checked($value,$comp){
   if($value==$comp){
        return "checked";
   }else{
        return "";
   }
}
You can as well declare variables for response and feedback just like we did in the previous form processing.
The PHP script should come before your html opening tag.
Our form and php script to process the form will therefore look like this:
<?php
function get_extension($str)
{
	$i = strrpos($str,".");
	if (!$i) { return ""; }
	$l = strlen($str) - $i;
	$ext = substr($str,$i+1,$l);
	return $ext;
}
function validate_mage($file_name){
	$ext = get_extension($file_name);
	$allowed_extensions = array("jpg", "jpeg", "png","gif");
	if(in_array($ext,$allowed_extensions)){
		return true;
	}else{
		return false;
	}
}
function generate_token() {
	$alphabet = "abcdefghijklmnopqrstuwxyzABCDEFGHIJKLMNOPQRSTUWXYZ0123456789";
	$pass = array(); //remember to declare $pass as an array
	$alphaLength = strlen($alphabet) - 1; //put the length -1 in cache
	for ($i = 0; $i < 40; $i++) {
		$n = rand(0, $alphaLength);
		$pass[] = $alphabet[$n];
	}
	return implode($pass); //turn the array into a string
}
function add_person($fn,$ln,$phone,$email,$date_of_birth,$profile,$gender,$picture,$reading,$dancing,$movies,$music){
	/* Connect to the database
	   database username - > root
	   password -> empty
	   database name -> test
	*/
	$con = mysqli_connect("localhost","root","","test");
	/* Generate unique token for each person */
	$token = md5(time()).generate_token();
	/* Create the query string */
	$sql = "insert into persons(firstname,lastname,picture,phone,email,gender,date_of_birth,profile,reading,dancing,movies,music,token,date) values
	(
	'".$fn."',
	'".$ln."',
	'".$picture."',
	'".$phone."',
	'".$email."',
	'".$gender."',
	'".$date_of_birth."',
	'".$profile."',
	".$reading.",
	".$dancing.",
	".$movies.",
	".$music.",
	'".$token."',
	CURDATE()
	)
	";
	if(mysqli_query($con,$sql)){
		/* Close database connection */
		mysqli_close($con);
		return true;
	}else{
		mysqli_close($con);
		return false;
	}
}
/* Selected option function */
function option_selected($value,$comp){
   if($value==$comp){
        return "selected";
   }else{
        return "";
   }
}
/* Checked input function  */
function is_checked($value,$comp){
   if($value==$comp){
        return "checked";
   }else{
        return "";
   }
}
/* Initialize form data */
$feedback = 0;
$response = "";
$fn = "";
$ln = "";
$phone = "";
$email = "";
$day = "";
$month = "";
$year = "";
$profile = "";
$gender = "";
$reading = 0;
$reading=0;
$dancing = 0;
$dancing=0;
$music = 0;
$music=0;
$movies = 0;
/* Check if form is submitted to retrieve the values */
if(isset($_POST['fn'])){
    $fn = $_POST['fn'];
    $ln = $_POST['ln'];
    $phone = $_POST['phone'];
    $email = $_POST['email'];
    $day = $_POST['day'];
    $month = $_POST['month'];
    $year = $_POST['year'];
    $profile = $_POST['profile'];
    $gender = "";
	$picture = $_FILES['picture']['name'];
    if(isset($_POST['gender'])){
        $gender = $_POST['gender'];
    }
    $reading = 0;
    if(isset($_POST['reading'])){
	$reading=1;
    }
    $dancing = 0;
    if(isset($_POST['dancing'])){
	$dancing=1;
    }
    $music = 0;
    if(isset($_POST['music'])){
	$music=1;
    }
    $movies = 0;
    if(isset($_POST['movies'])){
	$movies=1;
    }
}
?>
<html>
	<head>
		<style>
			input:focus,button:focus,TextArea:focus,select:focus{
				outline:none;
			}
			input[type="text"],input[type="email"],input[type="password"]{
				display: block;
				font-family: 'Open Sans Light', 'Open Sans', Arial, Helvetica, sans-serif;
				font-weight: 200;
				border: 1px solid #BEBEBE;
				color: #4A4A4A;
				font-size: 14px;
				padding: 5px;
				margin-top:5px;
			}
			input[type="text"]::placeholder,input[type="email"]::placeholder, input[type="password"]::placeholder{
				color: #6c757d;
				opacity: 1;
			}
			select{
				color: #4A4A4A;
				font-size: 14px;
				padding: 5px;
			}
			#animation{
				display:none;
				width:200px;
			}
			.spinner {
			  height: 10px;
			  width: 10px;
			  animation: rotate 0.8s infinite linear;
			  border: 8px solid #7CC1E6;
			  border-right-color: transparent;
			  border-radius: 50%;
			  margin-left:auto;
			  margin-right:auto;
			}

			@keyframes rotate {
			  0%    { transform: rotate(0deg); }
			  100%  { transform: rotate(360deg); }
			}
			.information p, .success p, .warning p,.validation p,.error p{
				margin-top: 5px;
			}
			.error {
				color: #D8000C;
				background-color: #FFBABA;
				background-image: url('images/error.png');
			}
			.information {
				color: #00529B;
				background-color: #BDE5F8;
				background-image: url('images/info.png');
			}
			.success {
				color: #4F8A10;
				background-color: #88ffd1;
				background-image:url('images/success.png');
			}
			.warning {
				color: #9F6000;
				background-color: #FEEFB3;
				background-image: url('images/warning.png');
			}
			.error,.success,.warning,.information {
				margin: 10px 0px;
				padding: 9px 10px 10px 50px;
				background-repeat: no-repeat;
				background-position: 10px center;
			}
			.feedback{
				width:400px;
			}
		</style>
	</head>
	<body>
		<h4>ADD PERSON</h4>
		<form method="POST" action="" id="AddPersonForm" enctype="multipart/form-data">
			<p><b>First Name</b>
			<br><input type="text" name="fn" value="<?php echo $fn;?>"/>
			</p>
			<p><b>Last Name</b>
			<br><input type="text" name="ln" value="<?php echo $ln;?>"/>
			</p>
			<p><b>Phone</b>
			<br><input type="text" name="phone" value="<?php echo $phone;?>"/>
			</p>
			<p><b>Email</b>
			<br><input type="email" name="email" value="<?php echo $email;?>"/>
			</p>
			<p><b>Gender</b>
			<br><input type="radio" name="gender" value="Male" <?php echo is_checked("Male",$gender);?>> Male <input type="radio" name="gender" value="Female" <?php echo is_checked("Female",$gender);?>> Female
			</p>
			<p><b>Date of Birth</b>
			<br><select name="day">
					<option value="">Day:</option>
					<?php
					for($i=1;$i<=31;$i++){
						if($i<10){
							$d = "0".$i;
						}else{
							$d = $i;
						}
						?>
						<option value="<?php echo $d;?>" <?php echo option_selected($d,$day);?>><?php echo $d;?></option>
						<?php
					}
					?>
				</select>
				<select name="month">
					<option value="">Month:</option>
					<option value="01" <?php echo option_selected("01",$month);?>>January</option>
					<option value="02" <?php echo option_selected("02",$month);?>>February</option>
					<option value="03" <?php echo option_selected("03",$month);?>>March</option>
					<option value="04" <?php echo option_selected("04",$month);?>>April</option>
					<option value="05" <?php echo option_selected("05",$month);?>>May</option>
					<option value="06" <?php echo option_selected("06",$month);?>>June</option>
					<option value="07" <?php echo option_selected("07",$month);?>>July</option>
					<option value="08" <?php echo option_selected("08",$month);?>>August</option>
					<option value="09" <?php echo option_selected("09",$month);?>>September</option>
					<option value="10" <?php echo option_selected("10",$month);?>>October</option>
					<option value="11" <?php echo option_selected("11",$month);?>>November</option>
					<option value="12" <?php echo option_selected("12",$month);?>>December</option>
				</select>
				<select name="year">
					<option value="">Year:</option>
					<?php
					$start = date('Y');
					$end = $start-150;
					for($i=$start;$i>=$end;$i--){
						?>
						<option value="<?php echo $i;?>"   <?php echo option_selected($i,$year);?>><?php echo $i;?></option>
						<?php
					}
					?>
				</select>
			</p>
			<p><b>Profile</b>
			<br><TextArea name="profile" rows="5"><?php echo $profile;?></TextArea>
			</p>
			<p><b>Hobbies</b>
			<br><input type="checkbox" name="reading" <?php echo is_checked(1,$reading);?>> Reading
			<br><input type="checkbox" name="movies" <?php echo is_checked(1,$movies);?>> Watching Movies
			<br><input type="checkbox" name="dancing" <?php echo is_checked(1,$dancing);?>> Dancing
			<br><input type="checkbox" name="music" <?php echo is_checked(1,$music);?>> Listening To Music
			</p>
			<p>Picture
			<br><input type="file" name="picture" accept="image/*"/>
			</p>
			<p><input type="submit" value="Add" /></p>
		</form>
	</body>
</html>
You can create a php file and run the above page to see how it works and study the code.
Let's proceed with the validation. The validation will be the same as the ajax_process.php file, we will assign the error message to the response variable and change the feedback value to 1 when the form processing is successful so that we display a successful message.
When the feedback is still 0 and the response variable is not empty, it means the form validation failed so we will display an error message.
We can write the feedback script below the form tag.
We use the script below to display success or error message when the form is submitted:
<?php
if(!empty($response)){
  if($feedback==1){
  ?>
    <div class="feedback"><div class="success"><?php echo $response;?></div></div>
<?php
}else{
  ?>
    <div class="feedback"><div class="error"><?php echo $response;?></div></div>
<?php
    }
}
?>
The complete form php script will therefore be:
<?php
function get_extension($str)
{
	$i = strrpos($str,".");
	if (!$i) { return ""; }
	$l = strlen($str) - $i;
	$ext = substr($str,$i+1,$l);
	return $ext;
}
function validate_mage($file_name){
	$ext = get_extension($file_name);
	$allowed_extensions = array("jpg", "jpeg", "png","gif");
	if(in_array($ext,$allowed_extensions)){
		return true;
	}else{
		return false;
	}
}
function generate_token() {
	$alphabet = "abcdefghijklmnopqrstuwxyzABCDEFGHIJKLMNOPQRSTUWXYZ0123456789";
	$pass = array(); //remember to declare $pass as an array
	$alphaLength = strlen($alphabet) - 1; //put the length -1 in cache
	for ($i = 0; $i < 40; $i++) {
		$n = rand(0, $alphaLength);
		$pass[] = $alphabet[$n];
	}
	return implode($pass); //turn the array into a string
}
function add_person($fn,$ln,$phone,$email,$date_of_birth,$profile,$gender,$picture,$reading,$dancing,$movies,$music){
	/* Connect to the database
	   database username - > root
	   password -> empty
	   database name -> test
	*/
	$con = mysqli_connect("localhost","root","","test");
	/* Generate unique token for each person */
	$token = md5(time()).generate_token();
	/* Create the query string */
	$sql = "insert into persons(firstname,lastname,picture,phone,email,gender,date_of_birth,profile,reading,dancing,movies,music,token,date) values
	(
	'".$fn."',
	'".$ln."',
	'".$picture."',
	'".$phone."',
	'".$email."',
	'".$gender."',
	'".$date_of_birth."',
	'".$profile."',
	".$reading.",
	".$dancing.",
	".$movies.",
	".$music.",
	'".$token."',
	CURDATE()
	)
	";
	if(mysqli_query($con,$sql)){
		/* Close database connection */
		mysqli_close($con);
		return true;
	}else{
		mysqli_close($con);
		return false;
	}
}
/* Selected option function */
function option_selected($value,$comp){
   if($value==$comp){
        return "selected";
   }else{
        return "";
   }
}
/* Checked input function  */
function is_checked($value,$comp){
   if($value==$comp){
        return "checked";
   }else{
        return "";
   }
}
/* Initialize form data */
$feedback = 0;
$response = "";
$fn = "";
$ln = "";
$phone = "";
$email = "";
$day = "";
$month = "";
$year = "";
$profile = "";
$gender = "";
$reading = 0;
$reading=0;
$dancing = 0;
$dancing=0;
$music = 0;
$music=0;
$movies = 0;
/* Check if form is submitted to retrieve the values */
if(isset($_POST['fn'])){
    $fn = $_POST['fn'];
    $ln = $_POST['ln'];
    $phone = $_POST['phone'];
    $email = $_POST['email'];
    $day = $_POST['day'];
    $month = $_POST['month'];
    $year = $_POST['year'];
    $profile = $_POST['profile'];
    $gender = "";
	$picture = $_FILES['picture']['name'];
    if(isset($_POST['gender'])){
        $gender = $_POST['gender'];
    }
    $reading = 0;
    if(isset($_POST['reading'])){
	$reading=1;
    }
    $dancing = 0;
    if(isset($_POST['dancing'])){
	$dancing=1;
    }
    $music = 0;
    if(isset($_POST['music'])){
	$music=1;
    }
    $movies = 0;
    if(isset($_POST['movies'])){
	$movies=1;
    }
	if(empty($fn)){
		$response = "Please enter your first name";
    }else if(empty($ln)){
		$response = "Please enter last name";
    }else if(empty($phone)){
		$response = "Please enter phone number";
    }else if(empty($email)){
		$response = "Please enter email address";
    }else if(empty($gender)){
		$response = "Please select gender";
    }else if((empty($day))||(empty($month))||(empty($year))||(!checkdate($month,$day,$year))){
		$response = "Please check date of birth";
    }else if(empty($profile)){
		$response = "Please enter profile";
    }else if(empty($picture)){
		$response = "Please upload a picture";
	}else if(!validate_mage($picture)){
		$response = "Please only jpg, jpeg, png or gif files allowed";
	}else{
		/* Get the extension */
		$ext = get_extension($picture);
		/* Rename file */
		$image = generate_token().".".$ext;
		$path = "pictures/".$image;
		/* Note - We are saving the pictures in the pictures folder that's why you created that folder */
		/* Savel Image */
		if(copy($_FILES['picture']['tmp_name'], $path)){
			/* Since date is inserted in the year-month-day format, create the date_of_birth string */
			$date_of_birth = $year."-".$month."-".$day;
			/* Call the database function to insert the information. Check if insertion is successful to give successful feedback */
			if(add_person($fn,$ln,$phone,$email,$date_of_birth,$profile,$gender,$image,$reading,$dancing,$movies,$music)){
				$response = "Information successfully recorded";
				$feedback = 1;
			}else{
				$response = "Failed adding person. Please try again later.";
			}
		}else{
			$response = "Image upload failed. Please try again later";
		}
    }
}
?>
<html>
	<head>
		<style>
			input:focus,button:focus,TextArea:focus,select:focus{
				outline:none;
			}
			input[type="text"],input[type="email"],input[type="password"]{
				display: block;
				font-family: 'Open Sans Light', 'Open Sans', Arial, Helvetica, sans-serif;
				font-weight: 200;
				border: 1px solid #BEBEBE;
				color: #4A4A4A;
				font-size: 14px;
				padding: 5px;
				margin-top:5px;
			}
			input[type="text"]::placeholder,input[type="email"]::placeholder, input[type="password"]::placeholder{
				color: #6c757d;
				opacity: 1;
			}
			select{
				color: #4A4A4A;
				font-size: 14px;
				padding: 5px;
			}
			#animation{
				display:none;
				width:200px;
			}
			.spinner {
			  height: 10px;
			  width: 10px;
			  animation: rotate 0.8s infinite linear;
			  border: 8px solid #7CC1E6;
			  border-right-color: transparent;
			  border-radius: 50%;
			  margin-left:auto;
			  margin-right:auto;
			}

			@keyframes rotate {
			  0%    { transform: rotate(0deg); }
			  100%  { transform: rotate(360deg); }
			}
			.information p, .success p, .warning p,.validation p,.error p{
				margin-top: 5px;
			}
			.error {
				color: #D8000C;
				background-color: #FFBABA;
				background-image: url('images/error.png');
			}
			.information {
				color: #00529B;
				background-color: #BDE5F8;
				background-image: url('images/info.png');
			}
			.success {
				color: #4F8A10;
				background-color: #88ffd1;
				background-image:url('images/success.png');
			}
			.warning {
				color: #9F6000;
				background-color: #FEEFB3;
				background-image: url('images/warning.png');
			}
			.error,.success,.warning,.information {
				margin: 10px 0px;
				padding: 9px 10px 10px 50px;
				background-repeat: no-repeat;
				background-position: 10px center;
			}
			.feedback{
				width:400px;
			}
		</style>
	</head>
	<body>
		<h4>ADD PERSON</h4>
		<form method="POST" action="" id="AddPersonForm" enctype="multipart/form-data">
			<p><b>First Name</b>
			<br><input type="text" name="fn" value="<?php echo $fn;?>"/>
			</p>
			<p><b>Last Name</b>
			<br><input type="text" name="ln" value="<?php echo $ln;?>"/>
			</p>
			<p><b>Phone</b>
			<br><input type="text" name="phone" value="<?php echo $phone;?>"/>
			</p>
			<p><b>Email</b>
			<br><input type="email" name="email" value="<?php echo $email;?>"/>
			</p>
			<p><b>Gender</b>
			<br><input type="radio" name="gender" value="Male" <?php echo is_checked("Male",$gender);?>> Male <input type="radio" name="gender" value="Female" <?php echo is_checked("Female",$gender);?>> Female
			</p>
			<p><b>Date of Birth</b>
			<br><select name="day">
					<option value="">Day:</option>
					<?php
					for($i=1;$i<=31;$i++){
						if($i<10){
							$d = "0".$i;
						}else{
							$d = $i;
						}
						?>
						<option value="<?php echo $d;?>" <?php echo option_selected($d,$day);?>><?php echo $d;?></option>
						<?php
					}
					?>
				</select>
				<select name="month">
					<option value="">Month:</option>
					<option value="01" <?php echo option_selected("01",$month);?>>January</option>
					<option value="02" <?php echo option_selected("02",$month);?>>February</option>
					<option value="03" <?php echo option_selected("03",$month);?>>March</option>
					<option value="04" <?php echo option_selected("04",$month);?>>April</option>
					<option value="05" <?php echo option_selected("05",$month);?>>May</option>
					<option value="06" <?php echo option_selected("06",$month);?>>June</option>
					<option value="07" <?php echo option_selected("07",$month);?>>July</option>
					<option value="08" <?php echo option_selected("08",$month);?>>August</option>
					<option value="09" <?php echo option_selected("09",$month);?>>September</option>
					<option value="10" <?php echo option_selected("10",$month);?>>October</option>
					<option value="11" <?php echo option_selected("11",$month);?>>November</option>
					<option value="12" <?php echo option_selected("12",$month);?>>December</option>
				</select>
				<select name="year">
					<option value="">Year:</option>
					<?php
					$start = date('Y');
					$end = $start-150;
					for($i=$start;$i>=$end;$i--){
						?>
						<option value="<?php echo $i;?>"   <?php echo option_selected($i,$year);?>><?php echo $i;?></option>
						<?php
					}
					?>
				</select>
			</p>
			<p><b>Profile</b>
			<br><TextArea name="profile" rows="5"><?php echo $profile;?></TextArea>
			</p>
			<p><b>Hobbies</b>
			<br><input type="checkbox" name="reading" <?php echo is_checked(1,$reading);?>> Reading
			<br><input type="checkbox" name="movies" <?php echo is_checked(1,$movies);?>> Watching Movies
			<br><input type="checkbox" name="dancing" <?php echo is_checked(1,$dancing);?>> Dancing
			<br><input type="checkbox" name="music" <?php echo is_checked(1,$music);?>> Listening To Music
			</p>
			<p>Picture
			<br><input type="file" name="picture" accept="image/*"/>
			</p>
			<p><input type="submit" value="Add" /></p>
		</form>
		<?php
		if(!empty($response)){
			if($feedback==1){
			?>
				<div class="feedback"><div class="success"><?php echo $response;?></div></div>
			<?php
			}else{
			?>
				<div class="feedback"><div class="error"><?php echo $response;?></div></div>
			<?php
			}
		}
		?>
	</body>
</html>
You can run and study the code.
If you also want to clear the fields after a successful processing, you can reset the input data variables so when the page is loaded after a successful processing, the form will be unfilled.
In that case the modified code will be:
<?php
function get_extension($str)
{
	$i = strrpos($str,".");
	if (!$i) { return ""; }
	$l = strlen($str) - $i;
	$ext = substr($str,$i+1,$l);
	return $ext;
}
function validate_mage($file_name){
	$ext = get_extension($file_name);
	$allowed_extensions = array("jpg", "jpeg", "png","gif");
	if(in_array($ext,$allowed_extensions)){
		return true;
	}else{
		return false;
	}
}
function generate_token() {
	$alphabet = "abcdefghijklmnopqrstuwxyzABCDEFGHIJKLMNOPQRSTUWXYZ0123456789";
	$pass = array(); //remember to declare $pass as an array
	$alphaLength = strlen($alphabet) - 1; //put the length -1 in cache
	for ($i = 0; $i < 40; $i++) {
		$n = rand(0, $alphaLength);
		$pass[] = $alphabet[$n];
	}
	return implode($pass); //turn the array into a string
}
function add_person($fn,$ln,$phone,$email,$date_of_birth,$profile,$gender,$picture,$reading,$dancing,$movies,$music){
	/* Connect to the database
	   database username - > root
	   password -> empty
	   database name -> test
	*/
	$con = mysqli_connect("localhost","root","","test");
	/* Generate unique token for each person */
	$token = md5(time()).generate_token();
	/* Create the query string */
	$sql = "insert into persons(firstname,lastname,picture,phone,email,gender,date_of_birth,profile,reading,dancing,movies,music,token,date) values
	(
	'".$fn."',
	'".$ln."',
	'".$picture."',
	'".$phone."',
	'".$email."',
	'".$gender."',
	'".$date_of_birth."',
	'".$profile."',
	".$reading.",
	".$dancing.",
	".$movies.",
	".$music.",
	'".$token."',
	CURDATE()
	)
	";
	if(mysqli_query($con,$sql)){
		/* Close database connection */
		mysqli_close($con);
		return true;
	}else{
		mysqli_close($con);
		return false;
	}
}
/* Selected option function */
function option_selected($value,$comp){
   if($value==$comp){
        return "selected";
   }else{
        return "";
   }
}
/* Checked input function  */
function is_checked($value,$comp){
   if($value==$comp){
        return "checked";
   }else{
        return "";
   }
}
/* Initialize form data */
$feedback = 0;
$response = "";
$fn = "";
$ln = "";
$phone = "";
$email = "";
$day = "";
$month = "";
$year = "";
$profile = "";
$gender = "";
$reading = 0;
$reading=0;
$dancing = 0;
$dancing=0;
$music = 0;
$music=0;
$movies = 0;
/* Check if form is submitted to retrieve the values */
if(isset($_POST['fn'])){
    $fn = $_POST['fn'];
    $ln = $_POST['ln'];
    $phone = $_POST['phone'];
    $email = $_POST['email'];
    $day = $_POST['day'];
    $month = $_POST['month'];
    $year = $_POST['year'];
    $profile = $_POST['profile'];
    $gender = "";
	$picture = $_FILES['picture']['name'];
    if(isset($_POST['gender'])){
        $gender = $_POST['gender'];
    }
    $reading = 0;
    if(isset($_POST['reading'])){
	$reading=1;
    }
    $dancing = 0;
    if(isset($_POST['dancing'])){
	$dancing=1;
    }
    $music = 0;
    if(isset($_POST['music'])){
	$music=1;
    }
    $movies = 0;
    if(isset($_POST['movies'])){
	$movies=1;
    }
	if(empty($fn)){
		$response = "Please enter your first name";
    }else if(empty($ln)){
		$response = "Please enter last name";
    }else if(empty($phone)){
		$response = "Please enter phone number";
    }else if(empty($email)){
		$response = "Please enter email address";
    }else if(empty($gender)){
		$response = "Please select gender";
    }else if((empty($day))||(empty($month))||(empty($year))||(!checkdate($month,$day,$year))){
		$response = "Please check date of birth";
    }else if(empty($profile)){
		$response = "Please enter profile";
    }else if(empty($picture)){
		$response = "Please upload a picture";
	}else if(!validate_mage($picture)){
		$response = "Please only jpg, jpeg, png or gif files allowed";
	}else{
		/* Get the extension */
		$ext = get_extension($picture);
		/* Rename file */
		$image = generate_token().".".$ext;
		$path = "pictures/".$image;
		/* Note - We are saving the pictures in the pictures folder that's why you created that folder */
		/* Savel Image */
		if(copy($_FILES['picture']['tmp_name'], $path)){
			/* Since date is inserted in the year-month-day format, create the date_of_birth string */
			$date_of_birth = $year."-".$month."-".$day;
			/* Call the database function to insert the information. Check if insertion is successful to give successful feedback */
			if(add_person($fn,$ln,$phone,$email,$date_of_birth,$profile,$gender,$image,$reading,$dancing,$movies,$music)){
				$response = "Information successfully recorded";
				$feedback = 1;
				$fn = "";
				$ln = "";
				$phone = "";
				$email = "";
				$day = "";
				$month = "";
				$year = "";
				$profile = "";
				$gender = "";
				$reading = 0;
				$reading=0;
				$dancing = 0;
				$dancing=0;
				$music = 0;
				$music=0;
				$movies = 0;
			}else{
				$response = "Failed adding person. Please try again later.";
			}
		}else{
			$response = "Image upload failed. Please try again later";
		}
    }
}
?>
<html>
	<head>
		<style>
			input:focus,button:focus,TextArea:focus,select:focus{
				outline:none;
			}
			input[type="text"],input[type="email"],input[type="password"]{
				display: block;
				font-family: 'Open Sans Light', 'Open Sans', Arial, Helvetica, sans-serif;
				font-weight: 200;
				border: 1px solid #BEBEBE;
				color: #4A4A4A;
				font-size: 14px;
				padding: 5px;
				margin-top:5px;
			}
			input[type="text"]::placeholder,input[type="email"]::placeholder, input[type="password"]::placeholder{
				color: #6c757d;
				opacity: 1;
			}
			select{
				color: #4A4A4A;
				font-size: 14px;
				padding: 5px;
			}
			#animation{
				display:none;
				width:200px;
			}
			.spinner {
			  height: 10px;
			  width: 10px;
			  animation: rotate 0.8s infinite linear;
			  border: 8px solid #7CC1E6;
			  border-right-color: transparent;
			  border-radius: 50%;
			  margin-left:auto;
			  margin-right:auto;
			}

			@keyframes rotate {
			  0%    { transform: rotate(0deg); }
			  100%  { transform: rotate(360deg); }
			}
			.information p, .success p, .warning p,.validation p,.error p{
				margin-top: 5px;
			}
			.error {
				color: #D8000C;
				background-color: #FFBABA;
				background-image: url('images/error.png');
			}
			.information {
				color: #00529B;
				background-color: #BDE5F8;
				background-image: url('images/info.png');
			}
			.success {
				color: #4F8A10;
				background-color: #88ffd1;
				background-image:url('images/success.png');
			}
			.warning {
				color: #9F6000;
				background-color: #FEEFB3;
				background-image: url('images/warning.png');
			}
			.error,.success,.warning,.information {
				margin: 10px 0px;
				padding: 9px 10px 10px 50px;
				background-repeat: no-repeat;
				background-position: 10px center;
			}
			.feedback{
				width:400px;
			}
		</style>
	</head>
	<body>
		<h4>ADD PERSON</h4>
		<form method="POST" action="" id="AddPersonForm" enctype="multipart/form-data">
			<p><b>First Name</b>
			<br><input type="text" name="fn" value="<?php echo $fn;?>"/>
			</p>
			<p><b>Last Name</b>
			<br><input type="text" name="ln" value="<?php echo $ln;?>"/>
			</p>
			<p><b>Phone</b>
			<br><input type="phone" name="phone" value="<?php echo $phone;?>"/>
			</p>
			<p><b>Email</b>
			<br><input type="email" name="email" value="<?php echo $email;?>"/>
			</p>
			<p><b>Gender</b>
			<br><input type="radio" name="gender" value="Male" <?php echo is_checked("Male",$gender);?>> Male <input type="radio" name="gender" value="Female" <?php echo is_checked("Female",$gender);?>> Female
			</p>
			<p><b>Date of Birth</b>
			<br><select name="day">
					<option value="">Day:</option>
					<?php
					for($i=1;$i<=31;$i++){
						if($i<10){
							$d = "0".$i;
						}else{
							$d = $i;
						}
						?>
						<option value="<?php echo $d;?>" <?php echo option_selected($d,$day);?>><?php echo $d;?></option>
						<?php
					}
					?>
				</select>
				<select name="month">
					<option value="">Month:</option>
					<option value="01" <?php echo option_selected("01",$month);?>>January</option>
					<option value="02" <?php echo option_selected("02",$month);?>>February</option>
					<option value="03" <?php echo option_selected("03",$month);?>>March</option>
					<option value="04" <?php echo option_selected("04",$month);?>>April</option>
					<option value="05" <?php echo option_selected("05",$month);?>>May</option>
					<option value="06" <?php echo option_selected("06",$month);?>>June</option>
					<option value="07" <?php echo option_selected("07",$month);?>>July</option>
					<option value="08" <?php echo option_selected("08",$month);?>>August</option>
					<option value="09" <?php echo option_selected("09",$month);?>>September</option>
					<option value="10" <?php echo option_selected("10",$month);?>>October</option>
					<option value="11" <?php echo option_selected("11",$month);?>>November</option>
					<option value="12" <?php echo option_selected("12",$month);?>>December</option>
				</select>
				<select name="year">
					<option value="">Year:</option>
					<?php
					$start = date('Y');
					$end = $start-150;
					for($i=$start;$i>=$end;$i--){
						?>
						<option value="<?php echo $i;?>"   <?php echo option_selected($i,$year);?>><?php echo $i;?></option>
						<?php
					}
					?>
				</select>
			</p>
			<p><b>Profile</b>
			<br><TextArea name="profile" rows="5"><?php echo $profile;?></TextArea>
			</p>
			<p><b>Hobbies</b>
			<br><input type="checkbox" name="reading" <?php echo is_checked(1,$reading);?>> Reading
			<br><input type="checkbox" name="movies" <?php echo is_checked(1,$movies);?>> Watching Movies
			<br><input type="checkbox" name="dancing" <?php echo is_checked(1,$dancing);?>> Dancing
			<br><input type="checkbox" name="music" <?php echo is_checked(1,$music);?>> Listening To Music
			</p>
			<p>Picture
			<br><input type="file" name="picture" accept="image/*"/>
			</p>
			<p><input type="submit" value="Add" /></p>
		</form>
		<?php
		if(!empty($response)){
			if($feedback==1){
			?>
				<div class="feedback"><div class="success"><?php echo $response;?></div></div>
			<?php
			}else{
			?>
				<div class="feedback"><div class="error"><?php echo $response;?></div></div>
			<?php
			}
		}
		?>
	</body>
</html>
GET METHOD
The Get key and value are placed in the url after the question mark. Each of the key and its value is separated with the & .
Examples
The values of the keys are obtained with the $_GET['key name comes here']
The key is the name of the input in the form. In the url it is the name that appears after the ? or the & before the =
The isset function can also be used to check if a GET key is set.
Let's create the form below and write the php script to process it as well:
<form method="GET" action="get_process.php">
	<p><b>Name</b>
	<br><input type="text" name="name" />
	</p>
	<p><b>Phone</b>
	<br><input type="text" name="phone" />
        </p>
	<p><input type="submit" value="GO" /></p>
</form>
get_process.php
<?php
if(isset($_GET['name'])){
	$name = $_GET['name'];
	$phone = $_GET['phone'];
	?>
	<p>Hello, <?php echo $name;?>! Your phone number is <?php echo $phone;?></p>
	<?php
}
?>
When you submit the form, observe the url.

GET vs. POST
Both GET and POST create an array (e.g. array( key1 => value1, key2 => value2, key3 => value3, ...)). This array holds key/value pairs, where keys are the names of the form controls and values are the input data from the user.
Both GET and POST are treated as $_GET and $_POST. These are superglobals, which means that they are always accessible, regardless of scope - and you can access them from any function, class or file without having to do anything special.
$_GET is an array of variables passed to the current script via the URL parameters.
$_POST is an array of variables passed to the current script via the HTTP POST method.
When to use GET?
Information sent from a form with the GET method is visible to everyone (all variable names and values are displayed in the URL). GET also has limits on the amount of information to send. The limitation is about 2000 characters. However, because the variables are displayed in the URL, it is possible to bookmark the page. This can be useful in some cases.
GET may be used for sending non-sensitive data.
Note: GET should NEVER be used for sending passwords or other sensitive information!
When to use POST?
Information sent from a form with the POST method is invisible to others (all names/values are embedded within the body of the HTTP request) and has no limits on the amount of information to send.
Moreover POST supports advanced functionality such as support for multi-part binary input while uploading files to server.
However, because the variables are not displayed in the URL, it is not possible to bookmark the page.
Since you have learned database, for your assignment, fetch and display the information you received from the user and stored in the database.
Remember the image name is stored in the database. So you use the image tag to display that image indicating the path of the image.
Solution (persons.php)
<?php
function checkbox_checked($value,$comp){
if($value==$comp){
/* Return the html code for correct */
return "✔";
}else{
return "";
}
}
function persons(){
/* Connect to the database */
$con = mysqli_connect("localhost","root","","test");
/* Create an array to store the fetched rows */
$persons = array();
/* SQL Query */
$sql = "select * from persons order by id desc";
$query = mysqli_query($con,$sql);
while($row=mysqli_fetch_array($query)){
array_push($persons,$row);
}
/* Close the database */
mysqli_close($con);
/* Return the persons array */
return $persons;
}
/* Get the persons from the database by calling the persons function */
$persons = persons();
if(count($persons)>0){
?>
<table width="100%" border="1">
<tr>
<th>First Name</th>
<th>Last Name</th>
<th>Picture</th>
<th>Phone</th>
<th>Email</th>
<th>Gender</th>
<th>Date Of Birth</th>
<th>Profile</th>
<th>Reading</th>
<th>Movies</th>
<th>Dancing</th>
<th>Music</th>
</tr>
<?php
foreach($persons as $person){
?>
<tr>
<td><?php echo $person['firstname'];?></td>
<td><?php echo $person['lastname'];?></td>
<td><img src="pictures/<?php echo $person['picture'];?>" width="100" /></td>
<td><?php echo $person['phone'];?></td>
<td><?php echo $person['email'];?></td>
<td><?php echo $person['gender'];?></td>
<td><?php echo $person['date_of_birth'];?></td>
<td><?php echo $person['profile'];?></td>
<td><?php echo checkbox_checked(1,$person['reading']);?></td>
<td><?php echo checkbox_checked(1,$person['movies']);?></td>
<td><?php echo checkbox_checked(1,$person['dancing']);?></td>
<td><?php echo checkbox_checked(1,$person['music']);?></td>
</tr>
<?php
}
?>
</table>
<?php
}else{
?>
<p>No person on record</p>
<?php
}
?>


Digital Address: GZ-033-0057
King Kotey Road
Teshie - Accra
Ghana
+233 59 993 7122
Finland
+358 44 986 0934
info@kuulchat.com
![]()
© Copyright 2015 - 2024
All Rights Reserved