REVISION OF CSS & HTML TAGS
- Paragraph
- Image
- Table
- List
- Div
- CSS ATTRIBUTES
- Background
- Width
- Height
- Margin
- Padding
- Font-size
- Font-weight
- Display
- Block
- Inline-block
- Div Positions
- Relative
- Absolute
- Fixed
- Classes & IDs
JAVASCRIPTS
- Introduction
- Functions
Explanations to week content
I will entreat you to take our web design course before taking this course. But if for some reasons you want to proceed, I will briefly revise some of the things in the web design course to help you understand certain web design basics.
You can as well take week 1 at least to get you started and also install the notepad++ editor which we will also use for this course as well.
REVISION OF CSS & HTML TAGS
<!DOCTYPE html>
<html>
<head>
<meta charset="ISO-8859-1">
<meta name="description" content="Brief description comes here" />
<meta name="keywords" content="Keywords for search engine optimization comes here" />
<title>Insert title here</title>
<link rel="shortcut icon" type="image/x-icon" href="images/icon.ico" />
<!-- Commenting in html -->
<!-- External CSS Sheet -->
<link rel="stylesheet" href="css/style.css" />
<style>

</style>
</head>
<body>

</body>
</html>
Figure: The Basic Html Elements
HTML ELEMENTS
An HTML element usually consists of a start tag(<Element Name>) and an end tag(</Element Name>), withthe content inserted in between:
<tagname>Content goes here...</tagname>
Basic Elements
A text header, denoted using the <h1>,<h2>, <h3>, <h4>, <h5>, <h6> tags.
Example:
<h1>I am a heading</h1>
<h2>I am a heading but size smaller than h1</h2>
<h3>I am a heading but size smaller than h2</h3>
<h4>I am a heading but size smaller than h3</h4>
<h5>I am a heading but size smaller than h4</h5>
<h6>I am a heading but size smaller than h1</h6>
A paragraph, denoted using the <p> tag.
Example:
<p>This is my first paragraph</p>
<p>This is my second paragraph</p>
<p>This is my third paragraph</p>
A horizontal ruler, denoted using the <hr> tag.
Example:
<p>This text will be underlined</p>
<hr>
A link, denoted using the <a> (anchor) tag.
Example:
<p><a href=”http://kuulchat.com”>Go to Kuulchat Website</a></p>
<p><a href=”http://kuulchat.com” target=”_blank”>Go to Kuulchat Website on a blank page</a></p>
NOTE:
href: the link url or page filename will be here in between quotation marks
target: if you want the page to be opened in a new tab with _blank text in between quotation marks.
A list, denoted using the <ul> (unordered list),<ol> (ordered list) and <li> (list element) tags.
Example:
<p>State of matter</p>
<ul>
	<li>Solid</li>
        <li>Liquid</li>
        <li>Gas</li>
</ul>
NOTE: The parent element of the list is the <ul> tag. The list items are placed in the list tag<li> in the parent element <ul> And has usual, any element tag you start, you must end it, the list elements are ended with the </ul> tag
A list item can also have another list items. In such case, a new list element is started in the <li> tag.
Example:
<p>List the state of matter and give two examples each</p>
<ul>
	<li>Solid.
		<ul>
			<li>Stone</li>
                                   <li>Wood</li>
		</ul>
	</li>
            <li>Liquid.
		<ul>
			<li>Water</li>
			<li>Oil</li>
		</ul>
	</li>
           <li>Gas
		<ul>
			<li>Air</li>
                                    <li>Oxygen</li>
		</ul>
	</li>
</ul>
An image, denoted using the <img> tag
Example:
<p><img src=”images/logo.png” width=”100”></img></p>
or
<p><img src=”images/logo.png”width=”100” /></p>
NOTE: If an element doesn’t any contentbetween the start tag and end tag, you can end the tag in the start tag (/>)as shown above.
The src is the source path of the image youwant to display. Write the path of your image in the quotation marks. In theabove example, the image is located in a folder named images which can be foundin the same project as the page displaying the page.
You can also display an image using the link of theimage.
Example:
<p><img src=” http://kuulchat.com/images/logo.png” width=”100” /></p>
A divider, denoted using the <div> tag
Examples:
<div>This is a divider 1 content</div>
<div>This is a divider 2 content</div>
A text span, denoted using the <span> tag. The span tag is normally use to style a particular text in a paragraph. Styling of elements will be explained in the next section.
Examples:
<p>I am a <span style=”color:red”>paragraph</span></p>
<p>I am a <span style=”font-weight:bold”>paragraph</span></p>
These elements are placed in the body tag. The body is what appears on the screen when the page is viewed.
ILLUSTRATION OF THE ABOVE ELEMENTS ON A WEB PAGE
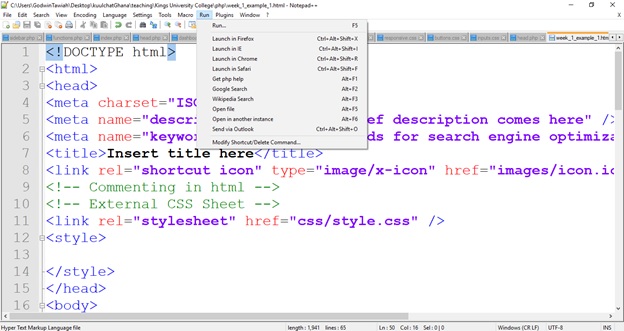
Figure: Running a page
NOTE:
Sometimes notepad++ may not give the option to run with a browser. If so, go directly to where you are saving your project and right click the file and open with any web browser on your machine.
<!DOCTYPE html>
<html>
<head>
<meta charset="ISO-8859-1">
<meta name="description" content="Brief description comes here" />
<meta name="keywords" content="Keywords for search engine optimization comes here" />
<title>Insert title here</title>
<link rel="shortcut icon" type="image/x-icon" href="images/icon.ico" />
<!-- Commenting in html -->
<!-- External CSS Sheet -->
<link rel="stylesheet" href="css/style.css" />
<style>

</style>
</head>
<body>
		<h1>I am a heading</h1>
		<h2>I am a heading but size smaller than h1</h2>
		<h3>I am a heading but size smaller than h2</h3>
		<h4>I am a heading but size smaller than h3</h4>
		<h5>I am a heading but size smaller than h4</h5>
		<h6>I am a heading but size smaller than h1</h6>
		<p>This is my first paragraph</p>
		<p>This is my second paragraph</p>
		<p>This is my third paragraph</p>
		<p>This text will be underlined</p>
		<hr>
		<p><a href=”http://kuulchat.com”>Go to Kuulchat Website</a></p>
<p><a href=”http://kuulchat.com” target=”_blank”>Go to Kuulchat Website on a blank page</a>
             </p>
		<p>State of matter</p>
		<ul>
			<li>Solid</li>
	       	 <li>Liquid</li>
	       	 <li>Gas</li>
		</ul>
		<p>List the state of matter and give two examples each</p>
		<ul>
			<li>Solid.
				<ul>
					<li>Stone</li>
	                           <li>Wood</li>
				</ul>
			</li>
	             <li>Liquid.
				<ul>
					<li>Water</li>
					<li>Oil</li>
				</ul>
			</li>
	             <li>Gas
				<ul>
					<li>Air</li>
	                   		<li>Oxygen</li>
				</ul>
			</li>
		</ul>
		<p><img src=”images/logo.png” width=”100” ></img></p>
		<p><img src=”images/logo.png” width=”100” /></p>
		<p><img src=” http://kuulchat.com/images/logo.png” width=”100”  /></p>
		<div>This is a divider 1 content</div>
		<div>This is a divider 2 content</div>
		<p>I am a <span style=”color:red”>paragraph</span></p>
    		<p>I am a <span style=”font-weight:bold”>paragraph</span></p>
</body>
</html>
Figure: Illustration code
Styling Elements
The <style> tag is used to define style information for an HTML document.
Inside the <style> element you specify how HTML elements should render in a browser.
Each HTML document can contain multiple <style>tags.
The style can be declared in the head or in the element itself.
STYLE IN THE HEAD
Style in the head is declared as element in the head as you have noticed above.
The syntax for declaring a style for an element in the head is:
element{
attribute name : value;
}
Thus the attribute name then a colon (:) then the value of the attribute and you end the attribute style with a semi colon (;)
Examples:
<style>
	p{
		color:red;
		font-size:12px;
}
body{
     background:red;
     font-size:12px;
}
</style>
Figure: Style Example
NOTE:
The attributes declared in the style for the element will affect the entire elements in the body. To override the general styled attributes in the head,you have to write an inline attribute to the particular element you wish to have the unique attribute.
To write a unique attribute for particular elements, you will have to declare the styles as a class or an id in the style in the head or the stylesheet file. A class style is declared in the style element as below:
.class_name{
attribute name : value;
}
Examples
.red_paragraph{
color:red;
}
.yellow_paragraph{
color:yellow;
}
.bold{
font-weight:bold;
}
To declare the class in the element you wish to have that unique attribute, you will declared in your element like this:
<element class=”Class_Name_Comes_Here”></element>
Examples
<p class=”red_paragraph”>This is a unique attribute</p>
<p class=”yellow_paragraph”>This is a unique attribute</p>
<p class=”bold”>This is a unique attribute</p>
You can have two or more names of classes in an element. You only need to write the class names separated by space.
Examples
<p class=”red_paragraph bold”>This has more than one class attribute</p>
<p class=”yellow_paragraph bold”>This has more than one class attribute</p>
An ID attribute is declared as:
#Name_of_the_id{
attribute name : value;
}
Examples
#red_paragraph{
color:red;
}
#yellow_paragraph{
color:yellow;
}
#bold{
font-weight:bold;
}
To declare an id in the element you wish to have that unique attribute, you will declared in your element like this:
<element id=”Id_Name_Comes_Here”></element>
Examples
<p id=”red_paragraph”>This is a unique attribute</p>
<p id=”yellow_paragraph”>This is a unique attribute</p>
<p id=”bold”>This is a unique attribute</p>
INLINE STYLE
To declare a style in an element you write the syntax below:
<element style=”Style_Attributes_Come_Here”></element>
Examples
<div style=”background:green;”>The content with the green background comes here</div>
<p style=”color:red;”>This paragraph will have a red color</p>
<p style=”color:yellow;font-weight:bold;”>This paragraph will have a yellow color and bold</p>
CSS ATTRIBUTES
| Attribute | Example |
|---|---|
| background | background:green; |
| height | height:100px; |
| font-size | font-size:12px; |
| font-weight | font-weight:bold; / font-weight:normal |
| display | display:block; / display:inline-block; |
| width | width:200px; |
| text-decoration | text-decoration:underline; |
| list-style | list-style:none; |
| margin | margin:10px 20px 10px 20px; or margin:10px; |
| padding | padding:10px 20px 10px 20px; or padding:10px; |
ILLUSTRATION
Add the above styles in the head and include the examples in the body tag.
<!DOCTYPE html>
<html>
<head>
<meta charset="ISO-8859-1">
<meta name="description" content="Brief description comes here" />
<meta name="keywords" content="Keywords for search engine optimization comes here" />
<title>Insert title here</title>
<link rel="shortcut icon" type="image/x-icon" href="images/icon.ico" />
<!-- Commenting in html -->
<!-- External CSS Sheet -->
<link rel="stylesheet" href="css/style.css" />
<style>
	p{
		color:red;
		font-size:12px;
	}
	body{
    	 background:red;
     	font-size:12px;
	}
	.red_paragraph{
		color:red;
	}
	.yellow_paragraph{
		color:yellow;
	}
	.bold{
		font-weight:bold;
	}
	#red_paragraph{
		color:red;
	}
	#yellow_paragraph{
		color:yellow;
	}
	#bold{
		font-weight:bold;
	}
</style>
</head>
<body>
	<p class="red_paragraph">This is a unique attribute</p>
	<p class="yellow_paragraph">This is a unique attribute</p>
	<p class="bold">This is a unique attribute</p>
	<p class="red_paragraph bold">This has more than one class attribute</p>
	<p class="yellow_paragraph bold">This has more than one class attribute</p>
	<p id="red_paragraph">This is a unique attribute</p>
	<p id="yellow_paragraph">This is a unique attribute</p>
	<p id="bold">This is a unique attribute</p>
	<div style="background:green;">The content with the green background comes here</div>
	<p style="color:red;">This paragraph will have a red color</p>
	<p style="color:yellow;font-weight:bold;">This paragraph will have a yellow color and bold</p>


</body>
</html>
Figure: Example Codes
JAVASCRIPT
JavaScript is the programming language of HTML and the Web.
The Javascript element tag is <script>. The Javascript codes or functions are then written in the Javascript tag
Declaring a variable in Javascript
var variableName;
Assigning a value to a variable in Javascript
variableName = valueForTheVariable;
Function In Javascript
function functionName(){
//Functioncode comes here
}
Function With An Argument
function functionName(variable){
//Functioncode comes here
}
A Javascript can be called in an element either when the page is loading (onload in the body tag), when a button is clicked (onClick in a button)
Example Code
The simple Javascript code below displays a welcome message anytime a page load.
<html>
	<head>
		<script>
			function welcomeMessage(){
				alert(“Welcome to Advance Web Programming”);
}
		</script>
	</head>
	<body onload=”welcomeMessage()”>

	</body>
</html>

We will discuss more on Javascript on our subsequent lectures.
CSS Layout - The position Property
The position property specifies the type of positioning method used for an element.
There are five different position values:
Elements are then positioned using the top, bottom, left, and right properties.
position: static;
HTML elements are positioned static by default.
Static positioned elements are not affected by the top, bottom, left, and right properties.
An element with position: static; is not positioned in any special way; it is always positioned according to the normal flow of the page:
<!DOCTYPE html>
<html>
<head>
<style>
div.static {
  position: static;
  border: 3px solid #73AD21;
}
</style>
</head>
<body>

<h2>position: static;</h2>

<div class="static">
  This div has position: static;
</div>

</body>
</html>
position: relative;
An element with position: relative; is positioned relative to its normal position.
Setting the top, right, bottom, and left properties of a relatively-positioned element will cause it to be adjusted away from its normal position.
Other content will not be adjusted to fit into any gap left by the element.
<!DOCTYPE html>
<html>
<head>
<style>
div.relative {
  position: relative;
  left: 30px;
  top:400px;
  border: 3px solid #73AD21;
}
</style>
</head>
<body>

<h2>position: relative;</h2>

<div class="relative">
This div element has position: relative;
</div>

</body>
</html>
position: fixed;
An element with position: fixed; is positioned relative to the viewport, which means it always stays in the same place even if the page is scrolled. The top, right, bottom, and left properties are used to position the element.
A fixed element does not leave a gap in the page where it would normally have been located.
Example
<!DOCTYPE html>
<html>
<head>
<style>
div.fixed {
  position: fixed;
  top:0;
  left:0;
  bottom: 0;
  right: 0;
  width: 300px;
  border: 3px solid #73AD21;
  background:#f0f0f0;
}
</style>
</head>
<body>

<h2>position: fixed;</h2>

<div class="fixed">
This div element has position: fixed;
</div>

</body>
</html>
position: absolute;
An element with position: absolute; is positioned relative to the nearest positioned ancestor (instead of positioned relative to the viewport, like fixed).
However; if an absolute positioned element has no positioned ancestors, it uses the document body, and moves along with page scrolling.
Note: A "positioned" element is one whose position is anything except static.
Here is a simple example:
Example
<html>
<head>
<style>
div.relative {
  position: relative;
  width: 400px;
  height: 200px;
  border: 3px solid #73AD21;
}

div.absolute {
  position: absolute;
  top: 20px;
  left: 0;
  width: 200px;
  height: 100px;
  border: 3px solid #73AD21;
}
</style>
</head>
<body>

<h2>position: absolute;</h2>

<div class="relative">
    <input type="text" id="search" style="width:200px" />
    <div class="absolute">
        <ul>
            <li>Result 1</li>
            <li>Result 2</li>
            <li>Result 3</li>
            <li>Result 4</li>
        </ul>
    </div>
    <p>This div element has position: relative;</p>
    <p>An element with position: absolute; is positioned relative to the nearest positioned ancestor (instead of positioned relative to the viewport, like fixed):
    </p>
</div>

</body>
</html>
position: sticky;
An element with position: sticky; is positioned based on the user's scroll position.
A sticky element toggles between relative and fixed, depending on the scroll position. It is positioned relative until a given offset position is met in the viewport - then it "sticks" in place (like position:fixed).
Note: Internet Explorer, Edge 15 and earlier versions do not support sticky positioning. Safari requires a -webkit- prefix (see example below). You must also specify at least one of top, right, bottom or left for sticky positioning to work.
Example
<!DOCTYPE html>
<html>
<head>
<style>
div.sticky {
  position: -webkit-sticky;
  position: sticky;
  top: 0;
  padding: 5px;
  background-color: #cae8ca;
  border: 2px solid #4CAF50;
}
</style>
</head>
<body>

<p>Try to <b>scroll</b> inside this frame to understand how sticky positioning works.</p>
<p>Note: IE/Edge 15 and earlier versions do not support sticky position.</p>

<div class="sticky">I am sticky!</div>

<div style="padding-bottom:2000px">
  <p>In this example, the sticky element sticks to the top of the page (top: 0), when you reach its scroll position.</p>
  <p>Scroll back up to remove the stickyness.</p>
  <p>Some text to enable scrolling.. Lorem ipsum dolor sit amet, illum definitiones no quo, maluisset concludaturque et eum, altera fabulas ut quo. Atqui causae gloriatur ius te, id agam omnis evertitur eum. Affert laboramus repudiandae nec et. Inciderint efficiantur his ad. Eum no molestiae voluptatibus.</p>
  <p>Some text to enable scrolling.. Lorem ipsum dolor sit amet, illum definitiones no quo, maluisset concludaturque et eum, altera fabulas ut quo. Atqui causae gloriatur ius te, id agam omnis evertitur eum. Affert laboramus repudiandae nec et. Inciderint efficiantur his ad. Eum no molestiae voluptatibus.</p>
</div>

</body>
</html>
Overlapping Elements
When elements are positioned, they can overlap other elements.
The z-index property specifies the stack order of an element (which element should be placed in front of, or behind, the others).
An element can have a positive or negative stack order:
An element with greater stack order is always in front of an element with a lower stack order.
Note: If two positioned elements overlap without a z-index specified, the element positioned last in the HTML code will be shown on top.
Example
<!DOCTYPE html>
<html>
<head>
<style>
img {
  position: absolute;
  left: 0px;
  top: 0px;
  z-index: -1;
}
</style>
</head>
<body>

<h1>This is a heading</h1>
<img src="images/banner.jpg" width="500" height="140">
<p>Because the image has a z-index of -1, it will be placed behind the text.</p>

</body>
</html>
You can download the image at this link or use the link in the src:
https://kuulchat.com/courses/resources/images/banner.jpg
banner.jpg
Positioning Text In an Image
<!DOCTYPE html>
<html>
<head>
<style>
.container {
  position: relative;
}

.topleft {
  position: absolute;
  top: 8px;
  left: 16px;
  font-size: 18px;
}
.topright {
  position: absolute;
  top: 8px;
  right: 16px;
  font-size: 18px;
}
.bottomleft {
  position: absolute;
  bottom: 40px;
  left: 16px;
  font-size: 18px;
}
.bottomright {
  position: absolute;
  bottom: 40px;
  right: 16px;
  font-size: 18px;
}
.center {
  position: absolute;
  top: 50%;
  width: 100%;
  text-align: center;
  font-size: 18px;
}
img {
  width: 100%;
  height: auto;
  opacity: 0.3;
}
</style>
</head>
<body>

<h2>Image Text</h2>
<p>Add some text to an image in the top left corner:</p>

<div class="container">
  <img src="images/banner.jpg" alt="Placing text over a banner" width="100%" height="300">
  <div class="topleft">Top Left</div>
  <div class="topright">Top Right</div>
  <div class="bottomleft">Bottom Left</div>
  <div class="bottomright">Bottom Right</div>
  <div class="center">Center</div>
</div>

</body>
</html>
APPLYING THE CSS AND POSITION CONCEPT TO CREATE SIMPLE DASHBOARD PAGE
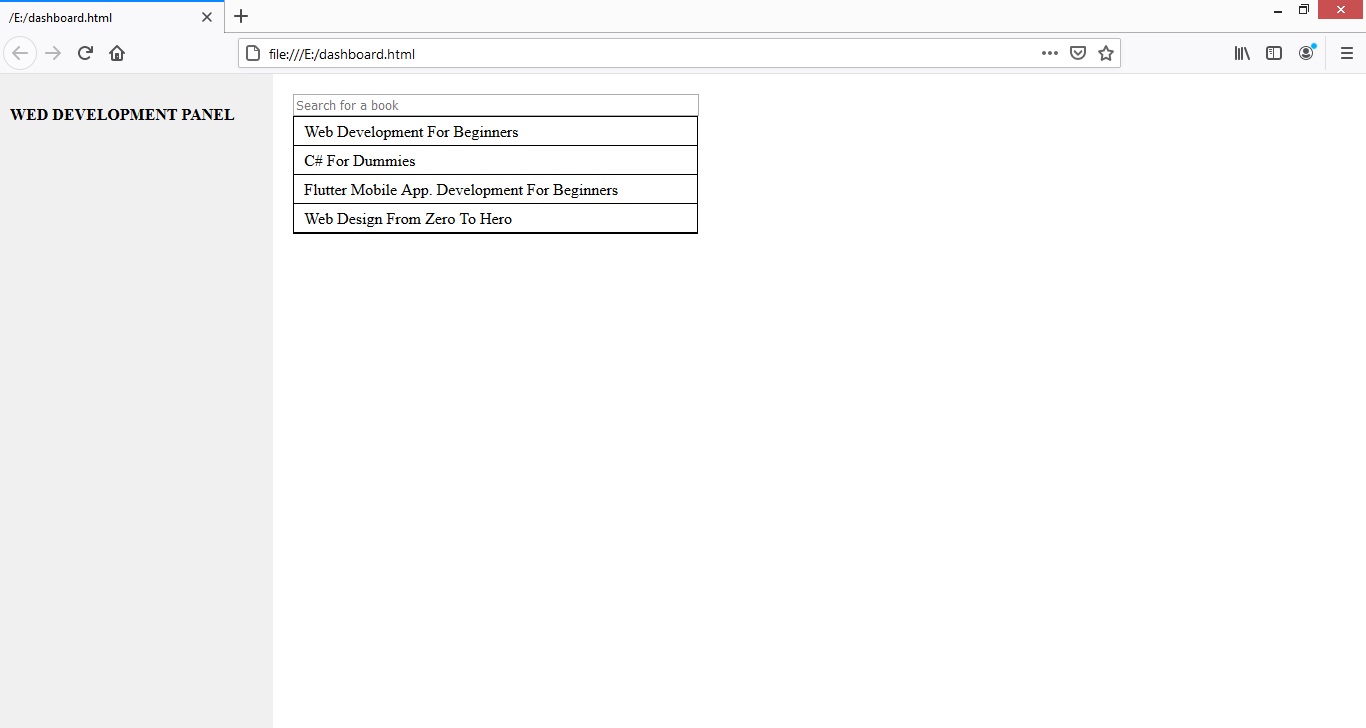
THE DASHBOARD CODE
<!DOCTYPE html>
<html>
<head>
<style>
.left{
    position:fixed;
    background:#f0f0f0;
    top:0;
    right:0;
    bottom:0;
    left:0;
    width:20%;
}
.inner{
  padding:10px;
}
.right{
  position:absolute;
  background:#fff;
  top:0;
  right:0;
  bottom:0;
  width:80%;
}
.result{
  position:absolute;
  top:42px;
  width:405px;
  background:#fff;
}
#search{
  width:400px;
}
.content{
 padding:20px;
}
.result ul{
   list-style-type:none;
   padding:0px;
   border:1px solid #000;
   margin:0px;
}
.result ul li{
  border-bottom:1px solid #000;
  padding:5px 10px 5px 10px;
}
</style>
</head>
<body>
    <div class="left">
        <div class="inner">
            <h4>WED DEVELOPMENT PANEL</h4>
        </div>
    </div>
    <div class="right">
        <div class="content">
            <input type="text" id="search" placeholder="Search for a book" />
            <div id="result" class="result">
                <ul>
                    <li>Web Development For Beginners</li>
                    <li>C# For Dummies</li>
                    <li>Flutter Mobile App. Development For Beginners</li>
                    <li>Web Design From Zero To Hero</li>
                </ul>
            </div>
            <h4>DASHBOARD</h4>
            <p>Our dashboard content comes here</p>
        </div>
    </div>
</body>
</html>
Display block & inline-block
The display attribute with a block value covers the entire width (space) unline the inline-block which covers a part of the space and other elements (div) can as well continue. The inline-block displays the elements in a horizontal while display block display them vertical since one element takes the entire space.
Examples
LIST WITH DISPLAY BLOCK AND INLINE BLOCK
<!DOCTYPE html>
<html>
	<head>
		<meta charset="ISO-8859-1">
		<meta name="description" content="Web programming tutorials" />
		<meta name="keywords" content="Introduction to PHP, PHP Programming" />
		<title>Display Attribute</title>
		<link rel="shortcut icon" type="image/x-icon" href="images/icon.ico" />
		<!-- Commenting in html -->
		<!-- External CSS Sheet -->
		<link rel="stylesheet" href="css/style.css" />
		<style>
			ul.menu li{
				display:block;
			}
			ul.menu_2 li{
				display: inline-block;
			}
		</style>
	</head>
	<body>
		<ul class="menu">
			<li>Home</li>
			<li>About Us</li>
			<li>Our Services</li>
			<li>Contact Us</li>
		</ul>
		<ul class="menu_2">
			<li>Home</li>
			<li>About Us</li>
			<li>Our Services</li>
			<li>Contact Us</li>
		</ul>
	</body>
</html>
DIVs WITH DISPLAY BLOCK AND INLINE BLOCK
<!DOCTYPE html>
<html>
	<head>
		<meta charset="ISO-8859-1">
		<meta name="description" content="Web programming tutorials" />
		<meta name="keywords" content="Introduction to PHP, PHP Programming" />
		<title>Display Attribute</title>
		<link rel="shortcut icon" type="image/x-icon" href="images/icon.ico" />
		<!-- Commenting in html -->
		<!-- External CSS Sheet -->
		<link rel="stylesheet" href="css/style.css" />
		<style>

		</style>
	</head>
	<body>
		<div style="background:yellow;display:block;height:20px;"></div>
		<div style="background:red;display:block;height:20px;"></div>
		<div style="background:yellow;display:inline-block;width:48%;height:20px;"></div>
		<div style="background:red;display:inline-block;width:48%;height:20px;float:right;"></div>
	</body>
</html>
ASSIGNMENT
Design a personal profile page


Digital Address: GZ-033-0057
King Kotey Road
Teshie - Accra
Ghana
+233 59 993 7122
Finland
+358 44 986 0934
info@kuulchat.com
![]()
© Copyright 2015 - 2024
All Rights Reserved