The VB .NET IDE: Visual Studio .NET
- Creating a New Solution
- The Editor
- The Solution Explorer
- Properties Window
Install Visual studio community edition
You can google or visit the link below:
https://visualstudio.microsoft.com/downloads/
NOTE: You have to download the community version which is free. The rest are trial version and will expire after the trial grace period.
Install after downloading and choose the .Net desktop development component by ticking it and maintain the default sub component. If you read you think you might need the other sub components of the .Net desktop development component, you can install but the default selected sub components are enough for this course.
NOTE: It will be downloading the component from the internet so you will need to be connected to the internet and have enough data around (3 - 5 GB)
Creating A New Solution
Select file -> New -> Project.
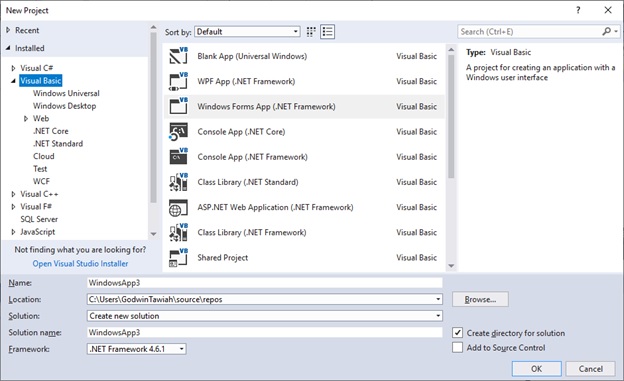
Select whether to create a console application or windows form application. Give your project a name and select the location your project should be saved to by clicking on the browse in case you wish to change the default location as shown in the diagram above.
Integrated Development Environment (IDE)
Integrated Development Environment (IDE) is a term commonly used to describe the interface and environment that we use to create our applications. It is called integrated because we can access virtually all of the development tools that we need from one screen called an interface.
The Visual Basic IDE is made up of:
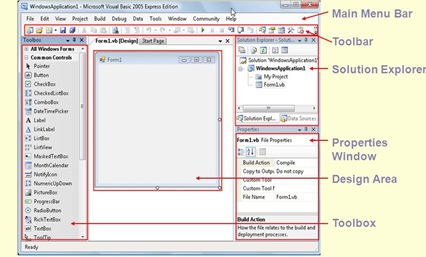
Menu Bar
This Menu Bar displays the commands that are required to build an application. The main menu items have sub menu items that can be chosen when needed.
The toolbars in the menu bar provide quick access to the commonly used commands and a button in the toolbar is clicked once to carryout the action represented by it.
Toolbox
The Toolbox contains a set of controls that are used to place on a Form at design time thereby creating the user interface area.
| Control | Description |
|---|---|
| Pointer | Provides a way to move and resize the controls form |
| PictureBox | Displays icons/bitmaps and meta files. It displays text or acts as a visual container for other controls. |
| TextBox | Used to display message and enter text. |
| Frame | Serves as a visual and functional container for controls |
| CommandButton | Used to carry out the specified action when the user chooses it. |
| CheckBox | Displays a True/False or Yes/No option. |
| OptionButton | OptionButton control which is a part of an option group allows the user to select only one option even it displays multiple choices. |
| ListBox | Displays a list of items from which a user can select one. |
| ComboBox | Contains a TextBox and a ListBox. This allows the user to select an ietm from the dropdown ListBox, or to type in a selection in the TextBox. |
| HScrollBar and VScrollBar | These controls allow the user to select a value within the specified range of values |
| Timer | Executes the timer events at specified intervals of time |
| DriveListBox | Displays the valid disk drives and allows the user to select one of them. |
| DirListBox | Allows the user to select the directories and paths, which are displayed. |
| FileListBox | Displays a set of files from which a user can select the desired one. |
| Shape | Used to add shape (rectangle, square or circle) to a Form |
| Line | Used to draw straight line to the Form |
| Image | used to display images such as icons, bitmaps and metafiles. But less capability than the PictureBox |
| Data | Enables the use to connect to an existing database and display information from it. |
| OLE | Used to link or embed an object, display and manipulate data from other windows based applications. |
| Label | Displays a text that the user cannot modify or interact with. |
Solution Explorer
The Solution Explorer is located on the right side of the screen, just under the toolbar. It serves as a quick reference to the various elements of a project namely form, classes and modules. All of the objects that make up the application are packed in a project. A simple project will typically contain one form, which is a window that is designed as part of a program's interface.
Properties Window
The Properties Window is located under the Solution Explorer Window. The Properties Window exposes the various characteristics of selected objects. Each and every form in an application is considered an object. Now,each object in Visual Basic has characteristics such as color and size. Other characteristics affect not just the appearance of the object but the way it behaves also. All these characteristics of an object are called its properties.A form has properties and any controls placed on the form also have properties.All these properties are displayed in the Properties Window.


Digital Address: GZ-033-0057
King Kotey Road
Teshie - Accra
Ghana
+233 54 753 9118
info@kuulchat.com
![]()
© Copyright 2015 - 2026
All Rights Reserved