Creating Your First Java Classes
- Features of the Java Programming Language
- Java Program Types
- Saving a Java Class
- Compiling a Java Class
- Running a Java Class
- Modifying a Java Class
Explanations to week content
Features Of The Java Programming Language
A computer program is a set of instructions that you write to tell a computer what to do.
Java was developed by Sun Micro systems as an object-oriented language for general-purpose business applications and for interactive, World Wide Web-based Internet applications.
Some of the advantages that have made Java so popular in recent years are its security features and the fact that it is architecturally neutral, which means that you can use Java to write a program that runs on any platform (operating system).
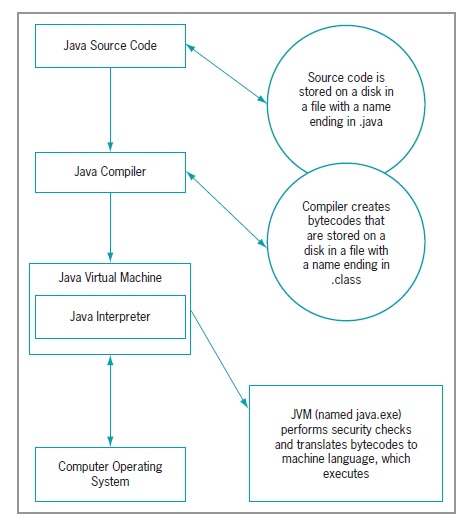
Java can be run on a wide variety of computers because it does not execute instructions on a computer directly. Instead, Java runs on a hypothetical computer known as the Java Virtual Machine (JVM).
When you write a Java program, you first construct the source code using a text editor such as Notepad. The statements are saved in a file;then, the Java compiler converts the source code into a binary program of byte code.
A program called the Java interpreter then checks the byte code and communicates with the operating system, executing the byte code instructions line by line within the Java Virtual Machine.
Because the Java program is isolated from the operating system, the Java program also is insulated from the particular hardware on which it is run.
Because of this insulation, the JVM provides security against intruders accessing your computer’s hardware through the operating system.Therefore, Java is more secure than other languages.
Another advantage provided by the JVM means less work for programmers—when using other programming languages,software vendors usually have to produce multiple versions of the same product (a Windows version, Macintosh version, UNIX version, Linux version, and so on) so all users can run the program. With Java, one program version will run on all these platforms.
Java Program Types
You can write two kinds of programs using Java
Java applications can be further subdivided into console applications, which support character output to a computer screen in aDOS window, for example, and windowed applications, which create a GUI with elements such as menus, toolbars, and dialog boxes.
Creating Your First Java Classes
We will be using Eclipse as the Java Integrated Development Environment (IDE)
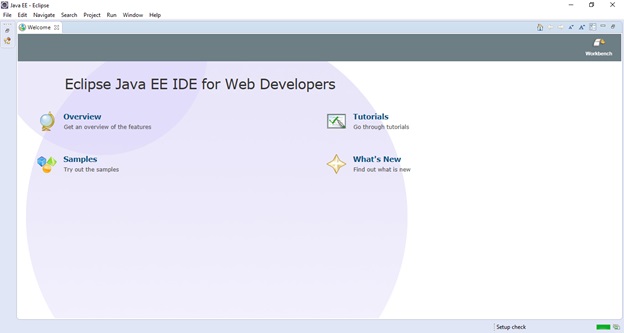
Figure: Eclipse IDE
NOTE: Before you download the java Eclipse IDE, download and install the Java Virtual Machine (JVM) also known as jdk or jre if not already installed.
You can download the latest Java Development Kit (jdk) Installer at: https://www.oracle.com/java/technologies/javase-downloads.html
You may be requested to create an account, verify your email and login on the oracle.com website before you are allowed to download the jdk.
Make sure you download the latest because the latest eclipse IDE you may install may need the latest jdk to work. If a lower version is installed, you will get an alert to install the appropriate version that eclipse requires. To avoid that, download the latest jkd and the latest eclipse IDE.
You can download the latest Eclipse IDE at:
https://www.eclipse.org/downloads/packages/
There are two installation packages.
The zipped package
The zipped folder with the eclipse application. That one is made so that you can have it on an external drive so you can just run the eclipse application in the folder without doing installation. You simply unzip the folder and copy the eclipse folder to the appropriate place. Anytime you want to use the eclipse IDE, you simply open that folder and run the eclipse application by double clicking on the eclipse icon (application).
The installer package
The installer package is an executable file which after downloading, you can install on your computer by double clicking on it. The disadvantage of this is that, anytime you wish to use on another machine, you have to have the executable file and install on the new machine. Unlike the folder package where you can run by simply opening the folder and clicking on the eclipse application. In both cases, you still need to install a java runtime environment in order to use the eclipse on a new machine.
So download any of the packages (zipped or installer) and install to your machine after installing the jdk.
NOTE:
If you haven't installed the Java Virtual Machine (Java Runtime Environment or Java Development Kit) and you start the eclipse application, you will get an error dialog box to prompt you to install the Java Runtime Environment.
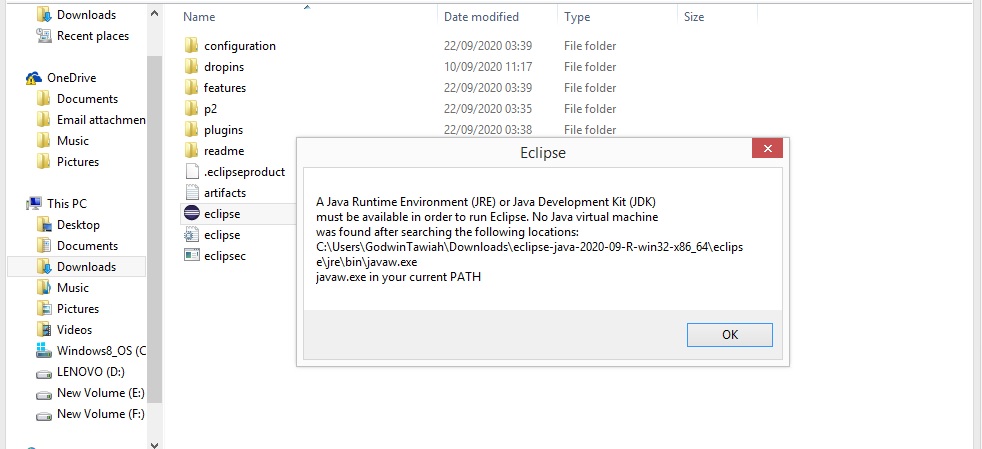
Figure: Eclipse error if Java Runtime Environment is not installed
Create Your First Java Project
1. Click on File -> New -> Project
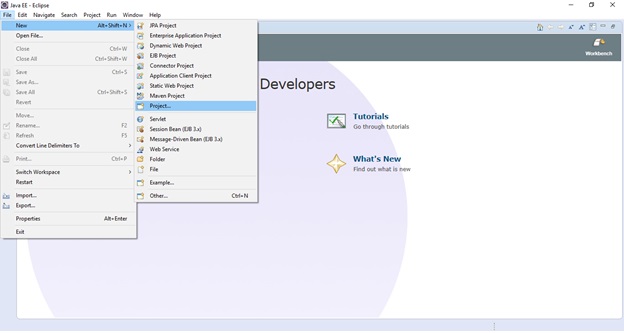
2. Select Java Project
3. Give the project a name

4. Click Finish
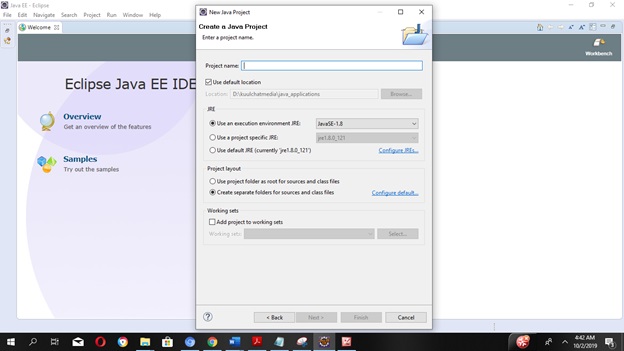
Figure: Java Project
The Java source codes are saved in the src.
Creating Your First Java Class
1. Right click on the src
2. Select new - > Class
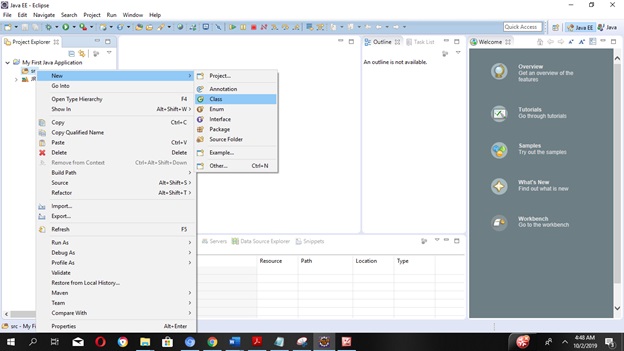
Figure: Creating a Java Class
3. Give the class a name
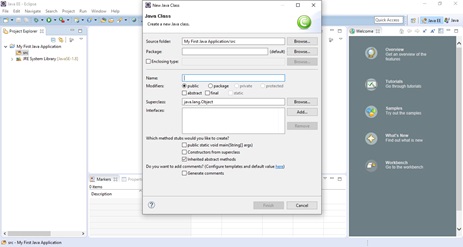
Figure: Creating a class
NOTE: There should be no space in the class name
4. Click Finish
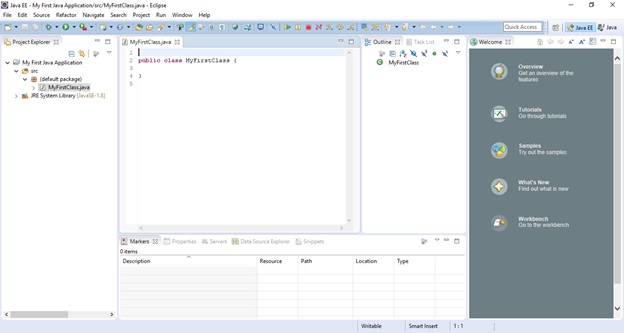
Figure: Java Class(MyFirstClass.java)
Add the code below to the generated initial Java code
public static void main(String[] args)
{
System.out.println("First Java application");
}
The Overall Code will then be:
public class MyFirstClass {
public static void main(String[] args)
{
System.out.println("First Java application");
}
}
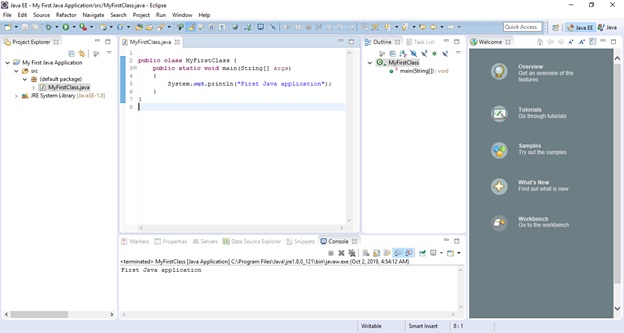
Figure: MyFirstClass java code
Running Your Java Code
To run your code, click on the run icon ![]()
The Java IDE automatically compiles the java source code and the output is displayed as shown in the figure above.
NOTE: The class in the project with the public static void main(String[] args)method is run. If your project has many class source files, most often a class is created by the name main.java and the public static void main method is included to start the program.
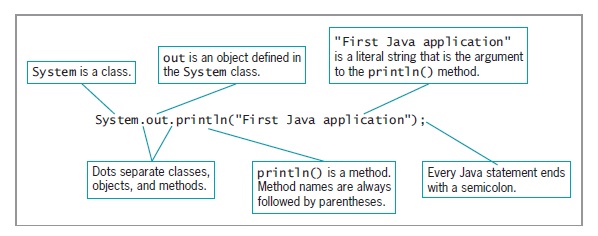
Anatomy Of Java Statement
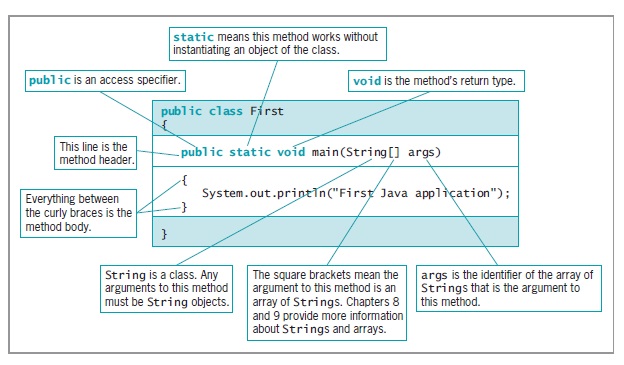
Figure: The parts of a typical main() method
Modifying a Java Class
To modify a class, you will have to edit the source code. For instance in MyFirstClass class, I can add a new syntax:
System.out.println("I am enjoying the Java Program");
The complete new source code will then be:
public class MyFirstClass {
public static void main(String[] args)
{
System.out.println("First Java application");
System.out.println("I am enjoying the Java Program");
}
}


Digital Address: GZ-033-0057
King Kotey Road
Teshie - Accra
Ghana
+233 59 993 7122
Finland
+358 44 986 0934
info@kuulchat.com
![]()
© Copyright 2015 - 2024
All Rights Reserved